

Fintag is currently available in South Korea, with international expansion on the roadmap. Interested in bringing Fintag to your market or partnering with us?
Introduction
A basic guide for first-time users: what Fintag is, how to get started, and how the interface is organized.
What can you do with Fintag?
Fintag is a corporate financial management service that gathers company funds scattered across multiple banks, card issuers, and securities firms into a single screen, and lets you ask an AI for analysis and reports.
Here is what changes for the person in charge:
- No more manual consolidation — Stop logging into multiple bank/card apps every day and copying balances and transactions into Excel. Link your certificate once and everything is collected automatically.
- Automated reporting — One line like "Create this month's cash report" and the AI produces an HWP document complete with tables and charts.
- Cashflow foresight — The AI predicts your future cashflow and automatically flags unusual transactions.
- Project-level cost control — Group card and account transactions into a project, track spending against budget, and generate a settlement report in the same screen.
- Recover money you were missing — Automatically tracks deposit/savings maturity dates and card payment dates to prevent late fees and missed opportunities, and lets you receive optimization proposals to switch to financial products with better terms.
- Decide in one place — Keep asset status, transaction history, and documents such as contracts and proposals together, so you can compare and decide in one place.
One-line summary: "Gather your company's scattered money on one screen, and just ask the AI."
Getting started (5-step tutorial)
Follow the steps below right after signing up, and the AI will be ready to understand your company's assets.
| Step | Action |
|---|---|
| 1 | Log in |
| 2 | Register your digital certificate (PC recommended) |
| 3 | Check your collected assets |
| 4 | Upload existing reports/contracts and run AI training |
| 5 | Ask the AI your first question |
The most important step is step 2 (certificate linking). Once it is done, balances, transactions, and maturity schedules fill in automatically.
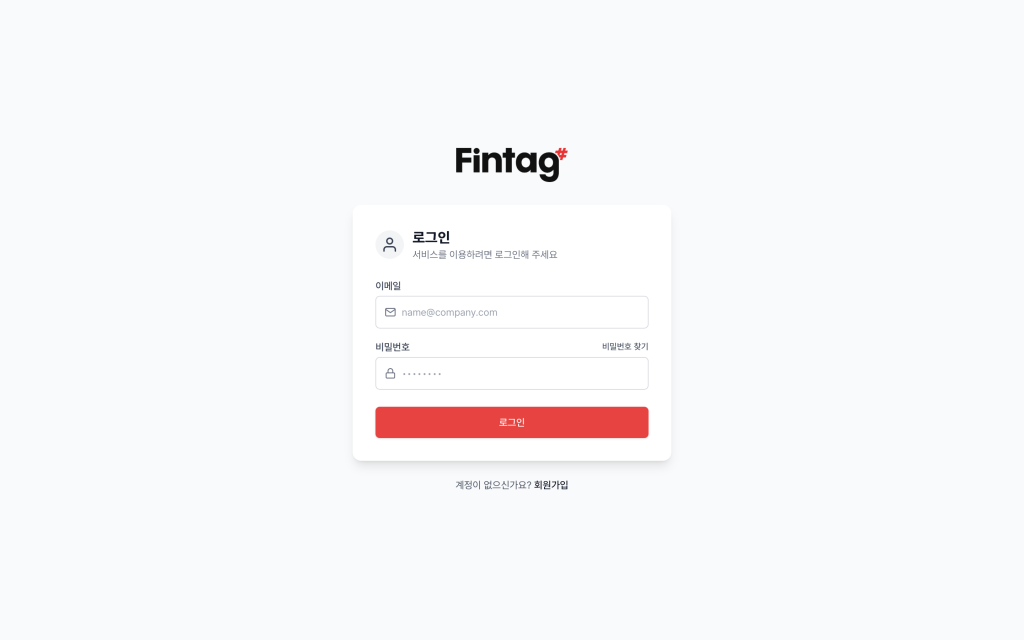
Step 1 - Log in
Enter the email and password you signed up with, or sign in quickly with your Google account.
- Please sign up with your company email (company domain). Personal emails such as gmail cannot be used.
- If you sign up with Google for the first time, a short onboarding flow follows: agree to the terms, then enter your company information.
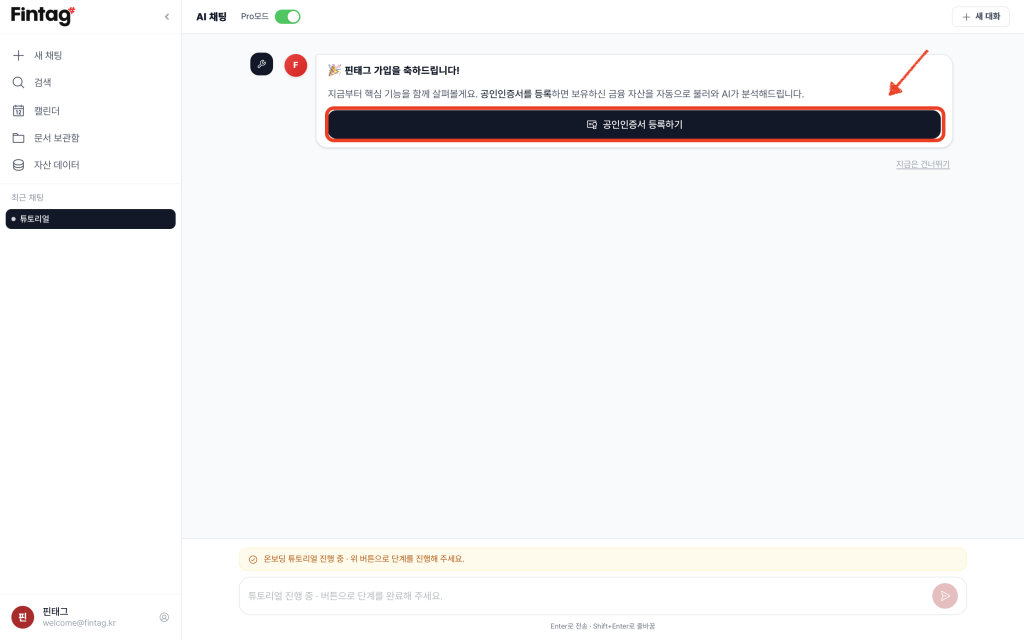
Step 2 - Register your digital certificate (PC Only)
A tutorial guides you to the certificate registration screen when you first log in.
※ Certificate linking is only available on PC.
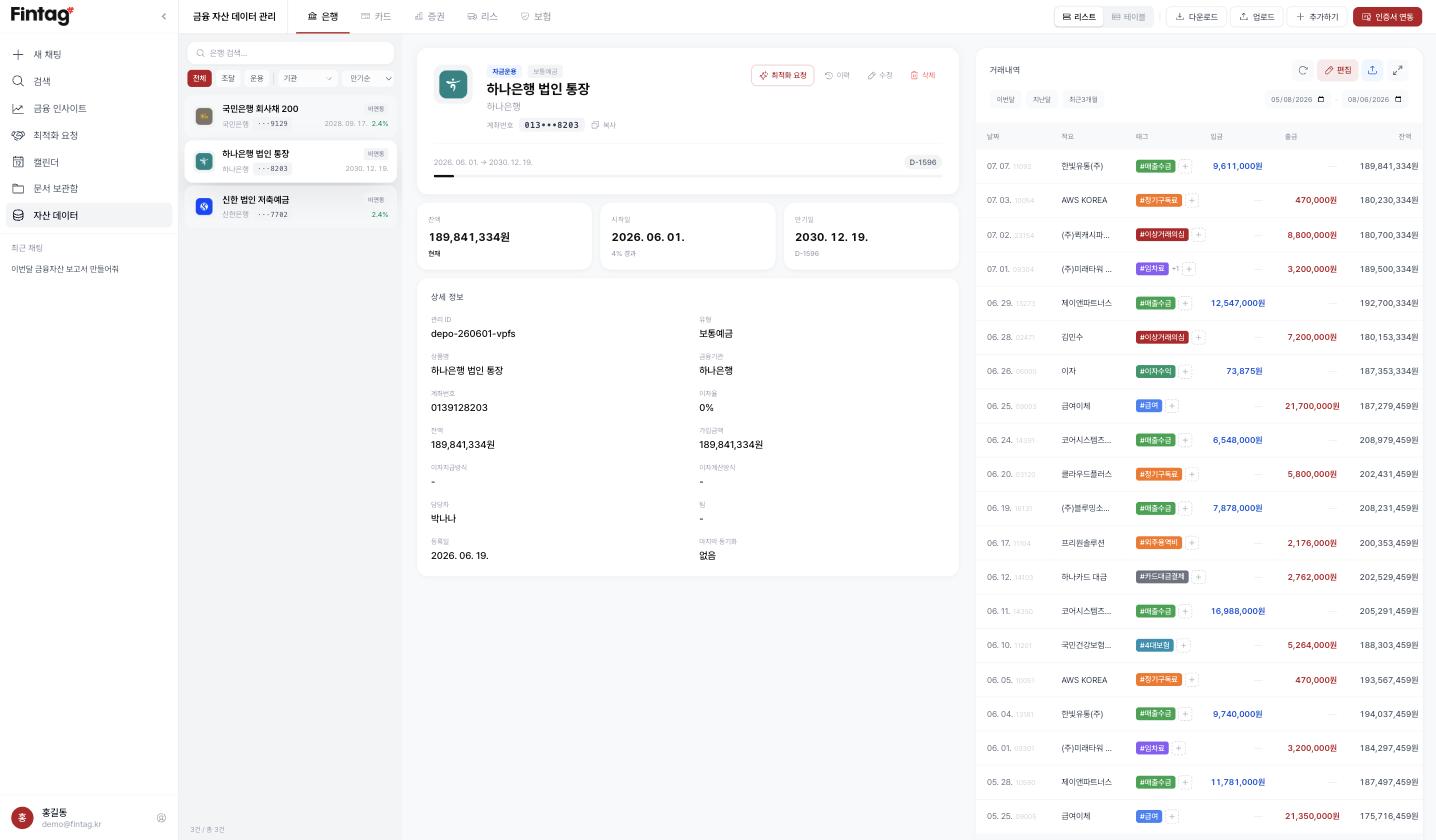
Step 3 - Check your collected assets
After linking completes, open the assets screen and confirm that bank, card, and securities balances and transactions have been filled in automatically.
Step 4 - AI document training
First, upload company documents such as contracts and Excel files.
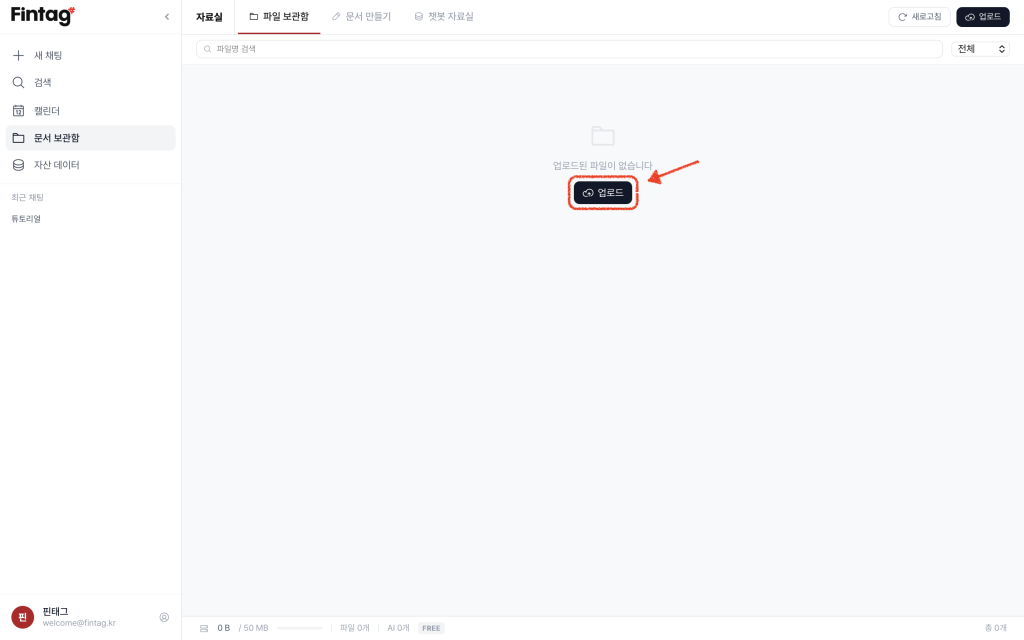
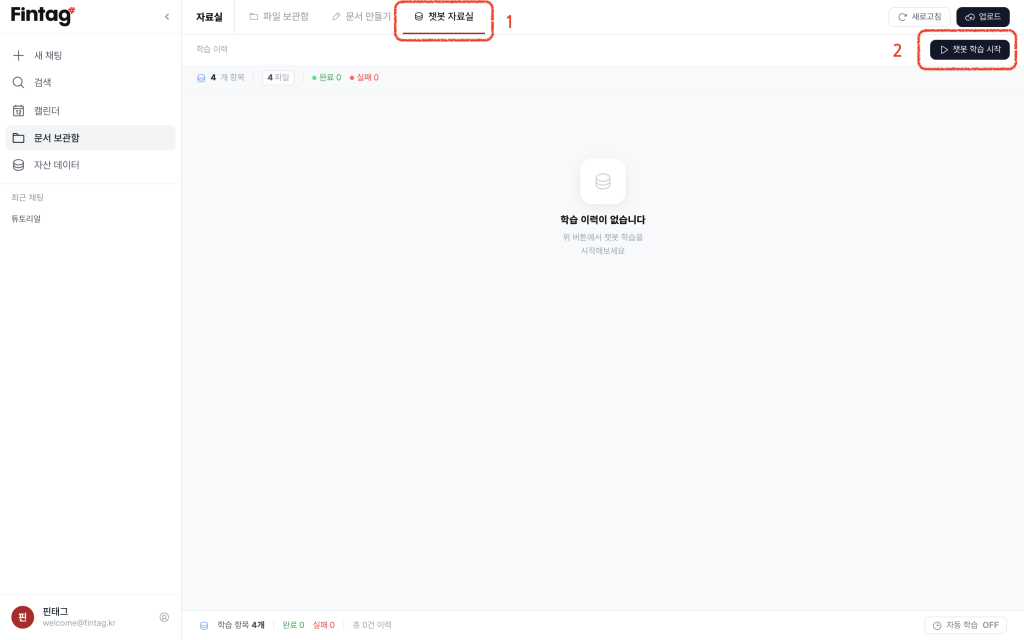
In the [Chatbot Library] tab at the top, press the "Start chatbot training" button and the Fintag chatbot will learn those documents.
Step 5 - Ask the AI your first question
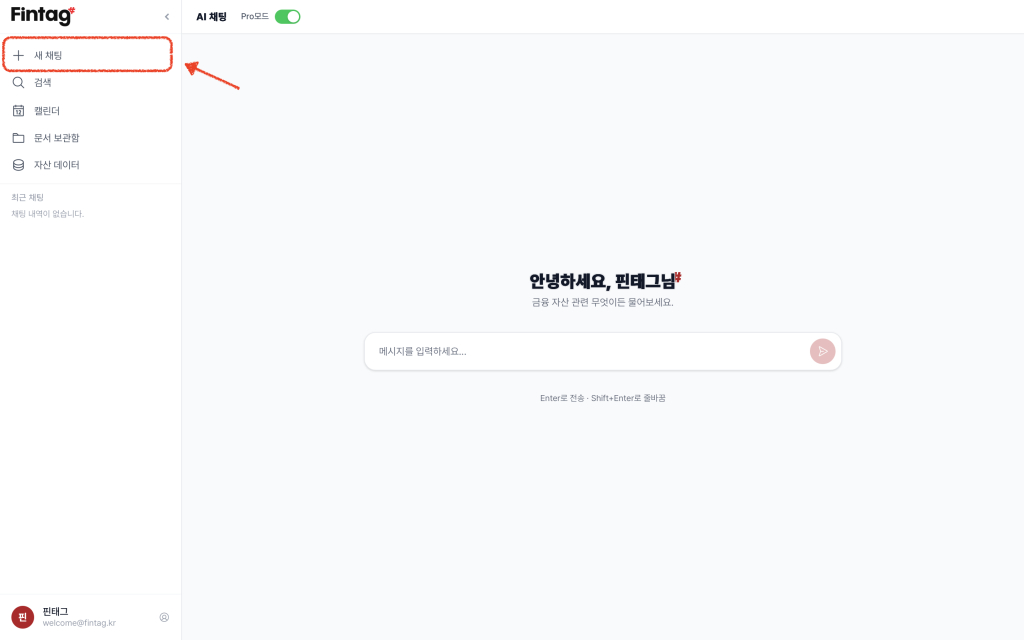
Type anything into the chat box — answers are generated from your asset data and uploaded documents.
A tour of the screens
Get an overview of the layout on PC and mobile.
PC (desktop) layout
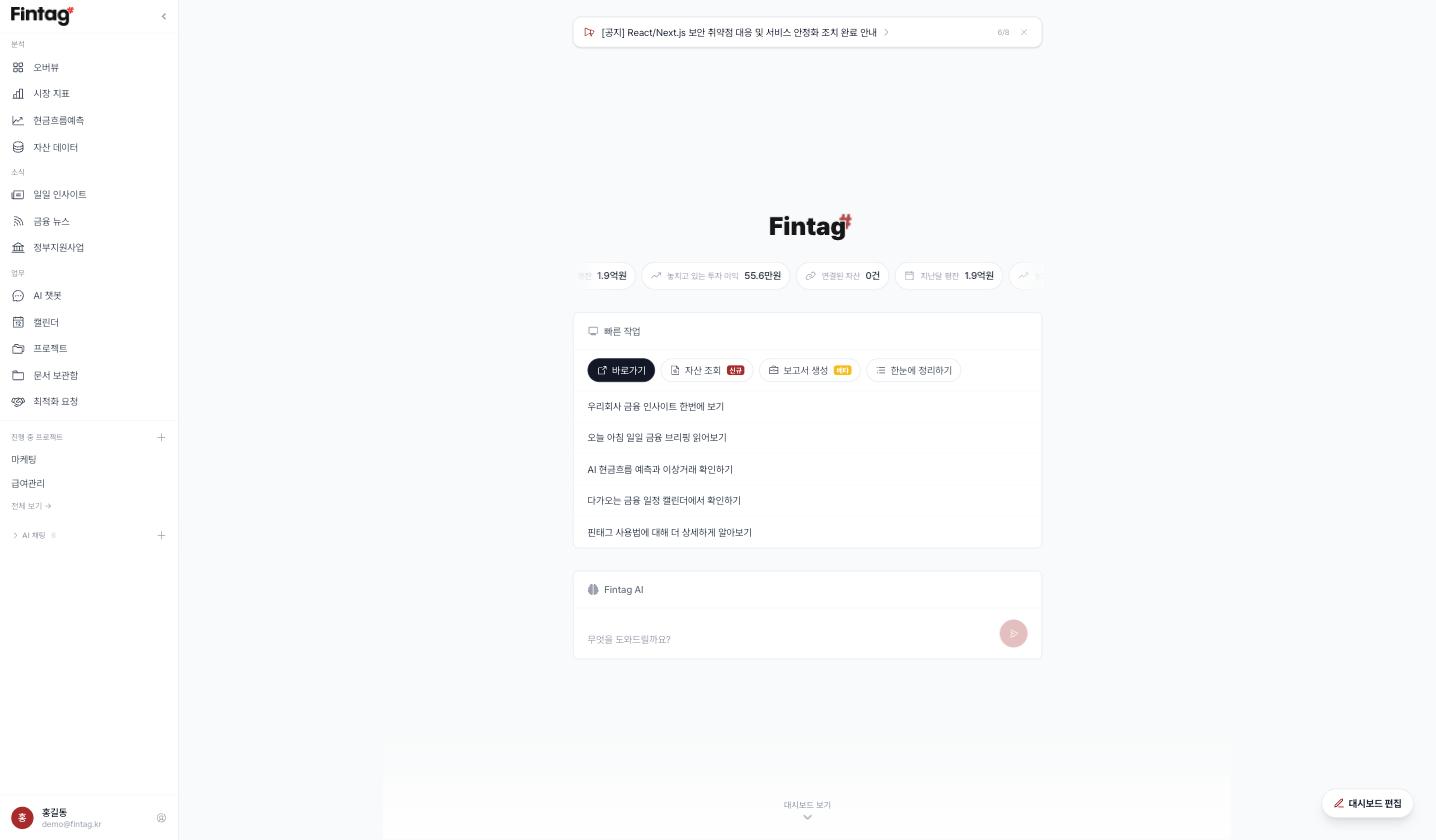
The left sidebar is the entry point to every screen. Menus are grouped into Analysis · News · Work.
| Group | Menus | Purpose |
|---|---|---|
| Analysis | Overview · Market Indicators · Cash Flow Forecast · Asset Data | Check your company's financial position |
| News | Daily Insight · Financial News · Government Support Programs | Externally sourced information, refreshed daily |
| Work | AI Chatbot · Calendar · Projects · Documents · Optimization Request | Screens where you actually get things done |
- Click the logo to return to the home dashboard. (Home is not a separate menu item.)
- Below the menus, active projects are listed with their budget usage rate (%). Press
+to create a new project immediately. - Expand the AI Chat section below that to see recent conversations, with search to find past chats.
- Click your name at the bottom left to open the user menu (settings, certificates, tags, inquiries, and more) as a popup.
- Use the arrow (‹) on the edge of the sidebar to collapse or expand it.
- The first time you visit each screen, a guided tour runs automatically to show where the key features are. To see it again, press [Replay tutorial] in the user menu.
The Work tabs
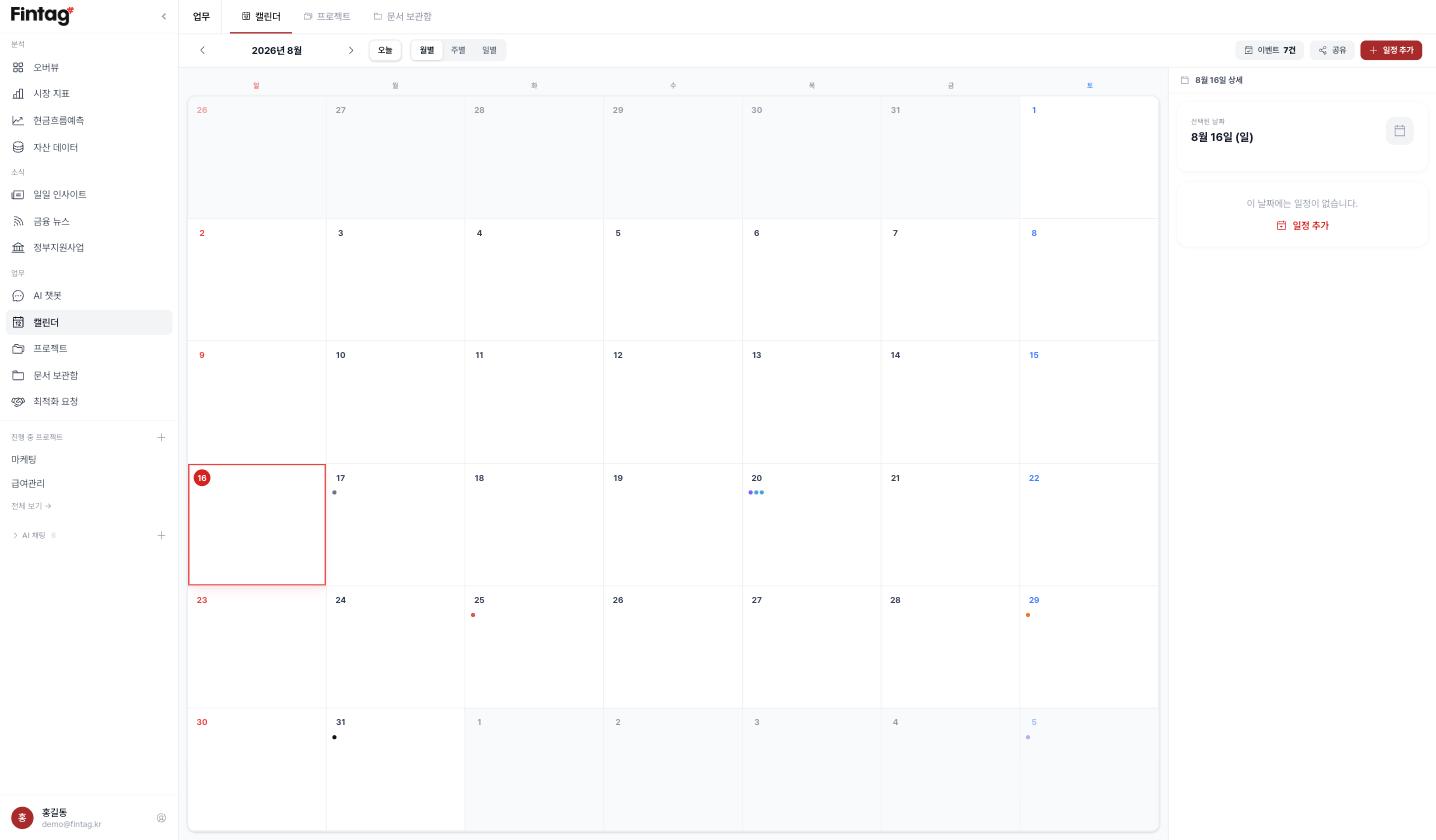
Calendar · Projects · Documents belong to one "Work" area. Wherever you are among the three, the tabs at the top of the screen move you between them.
Mobile layout
- Bottom tab bar:
Home·Chat·Work·Assets·Settings - The
Worktab opens the calendar; use the top tabs to reach Projects and Documents. - Tapping
Settingsslides up a menu sheet with the same items as the PC user menu, plus shortcuts to Financial Insights · Optimization Requests. - Certificate registration is not possible on a phone, but once registered on PC you can browse data and use AI chat freely on mobile.
- The document editor and guided tours are desktop-only.
App download
Fintag is also available as an iOS and Android app.
- iOS: Download on the App Store
- Android: Download on Google Play
※ Due to app store policies, certificate linking and subscription payments must be done on the PC web.
User menu items (bottom-left profile / mobile Settings)
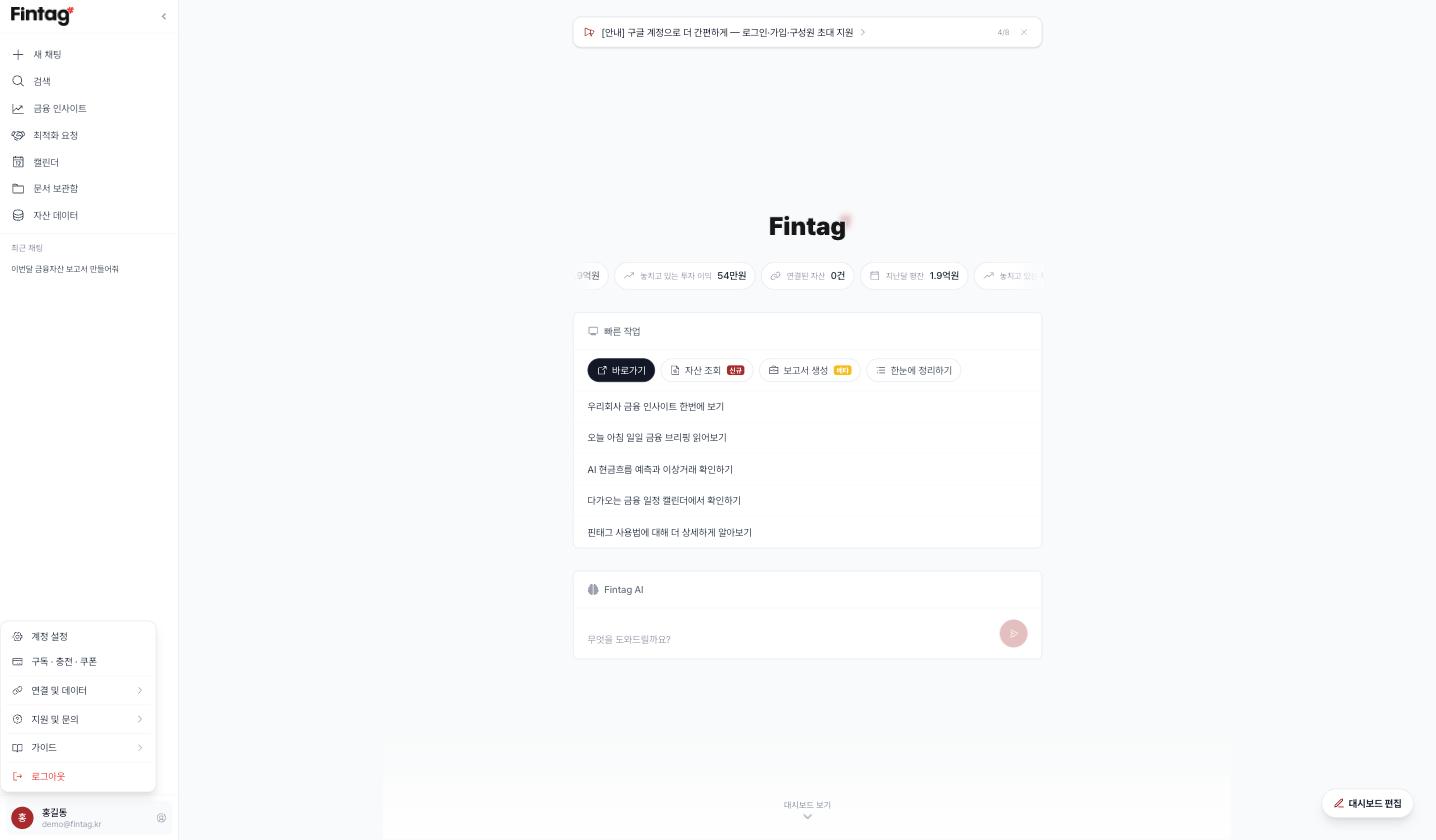
| Group | Items |
|---|---|
| My settings | Account Settings, Subscription · Tokens · Coupons |
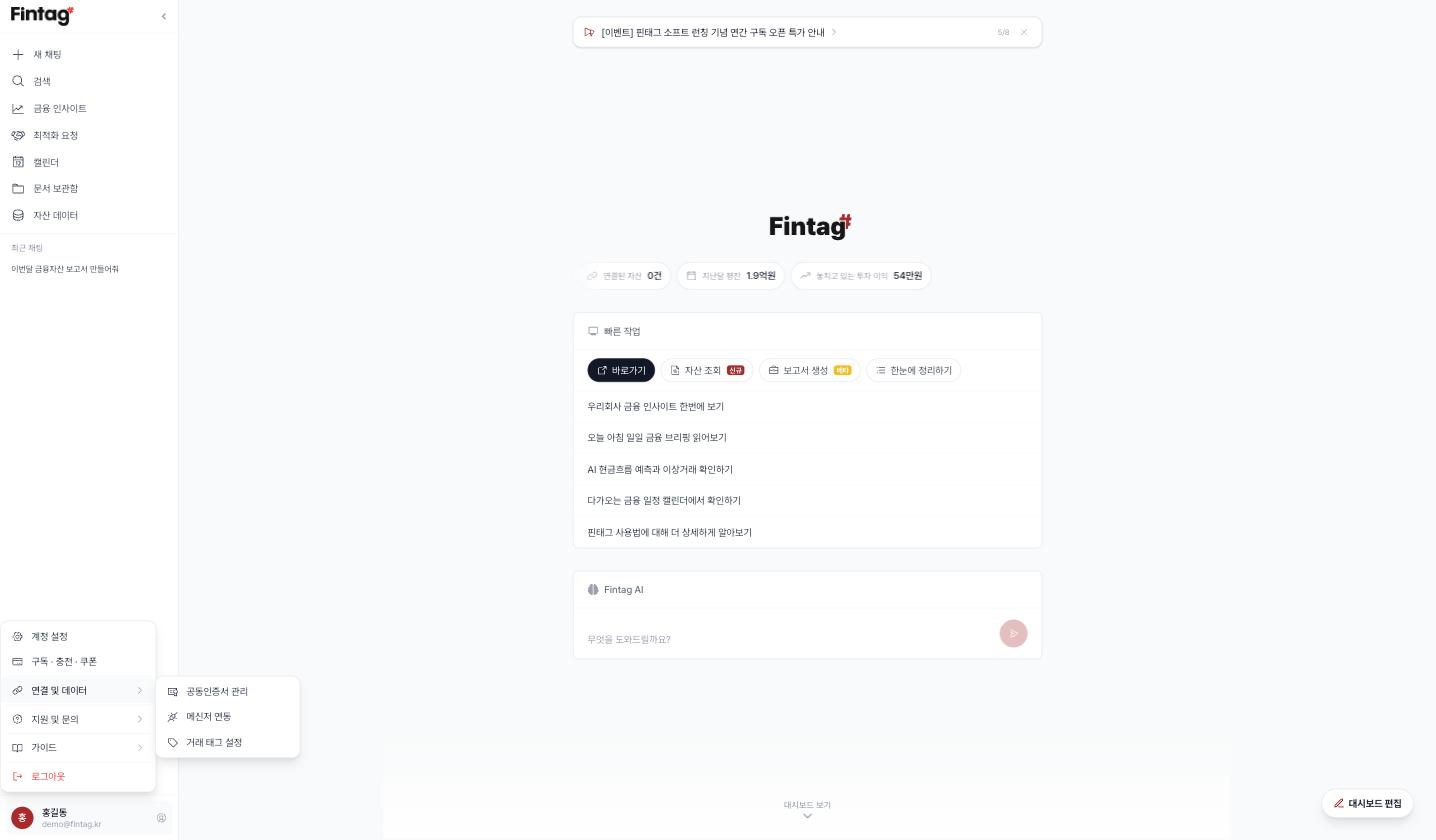
| Connections & data | Certificate Management, Messenger Integration, Transaction Tags |
| Support | 1:1 Inquiry, Announcements, Feedback & Bug Reports |
| Guide | Manual, Replay tutorial |
| Other | Log out |
Digital certificate linking
This is the key step that automatically imports bank, card, and securities transactions. It can only be done on PC (desktop).
Linking procedure
Step 1. Open [Certificate Management]
- Click your name at the bottom left → [Certificate Management] (on mobile: Settings → Certificate Management)
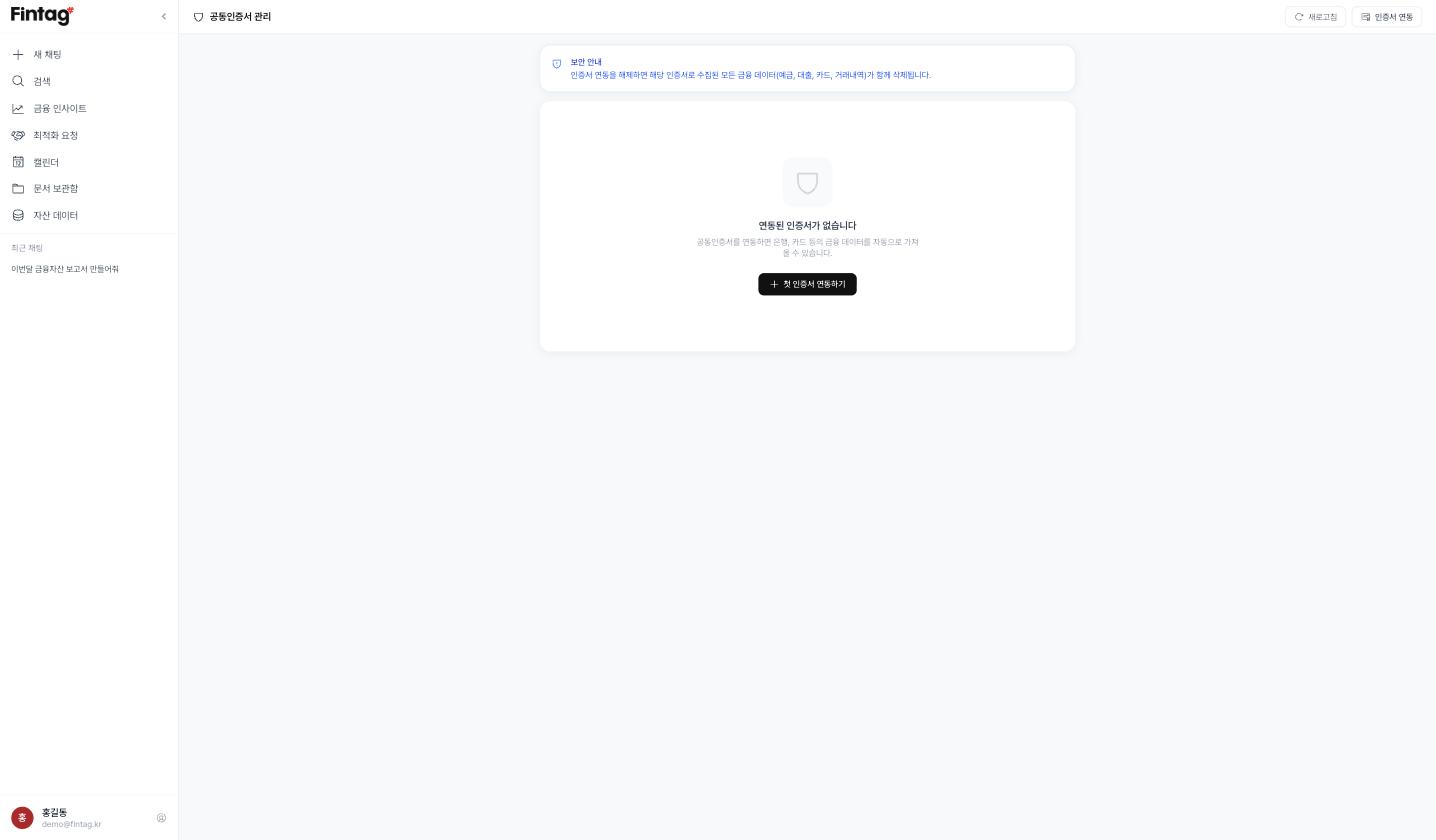
Step 2. Click the [Link Certificate] button — in the center or at the top right
- The management screen has two method tabs — Certificate / ID·Password — so you can view linked institutions by method.
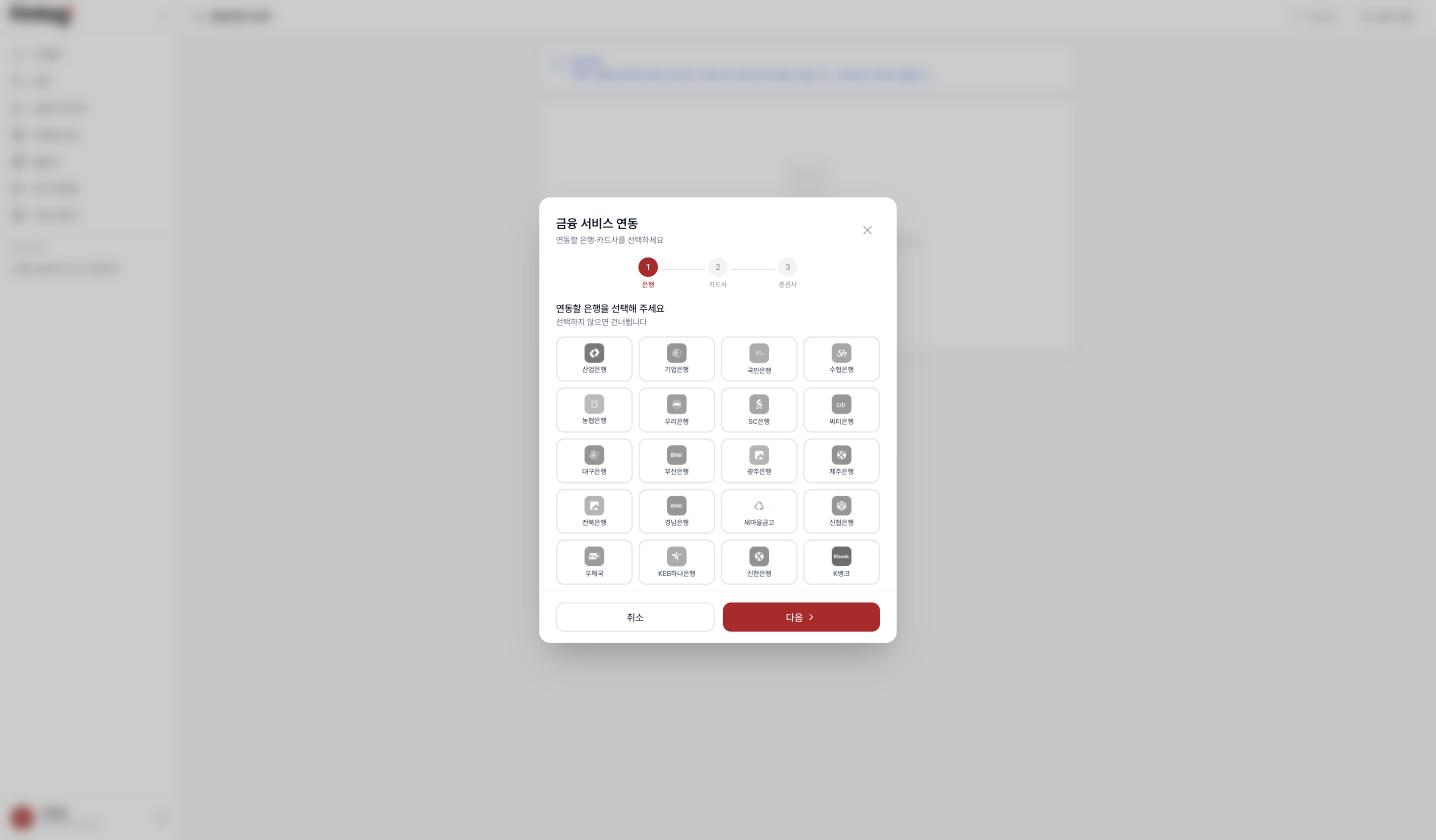
Step 3. Select banks — choose the banks to import and press Next
Step 4. Select card issuers — choose the card issuers to import and press Next
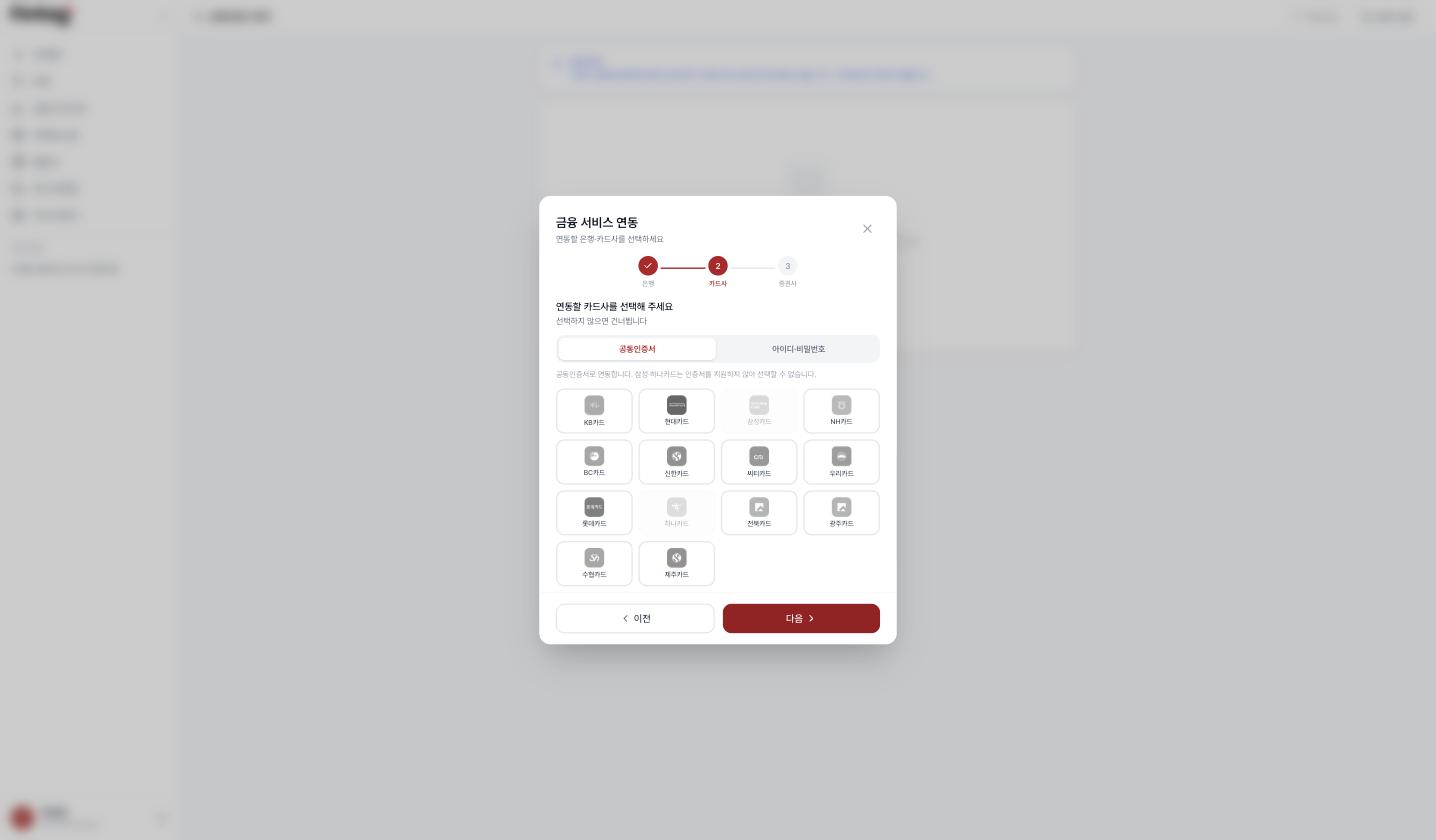
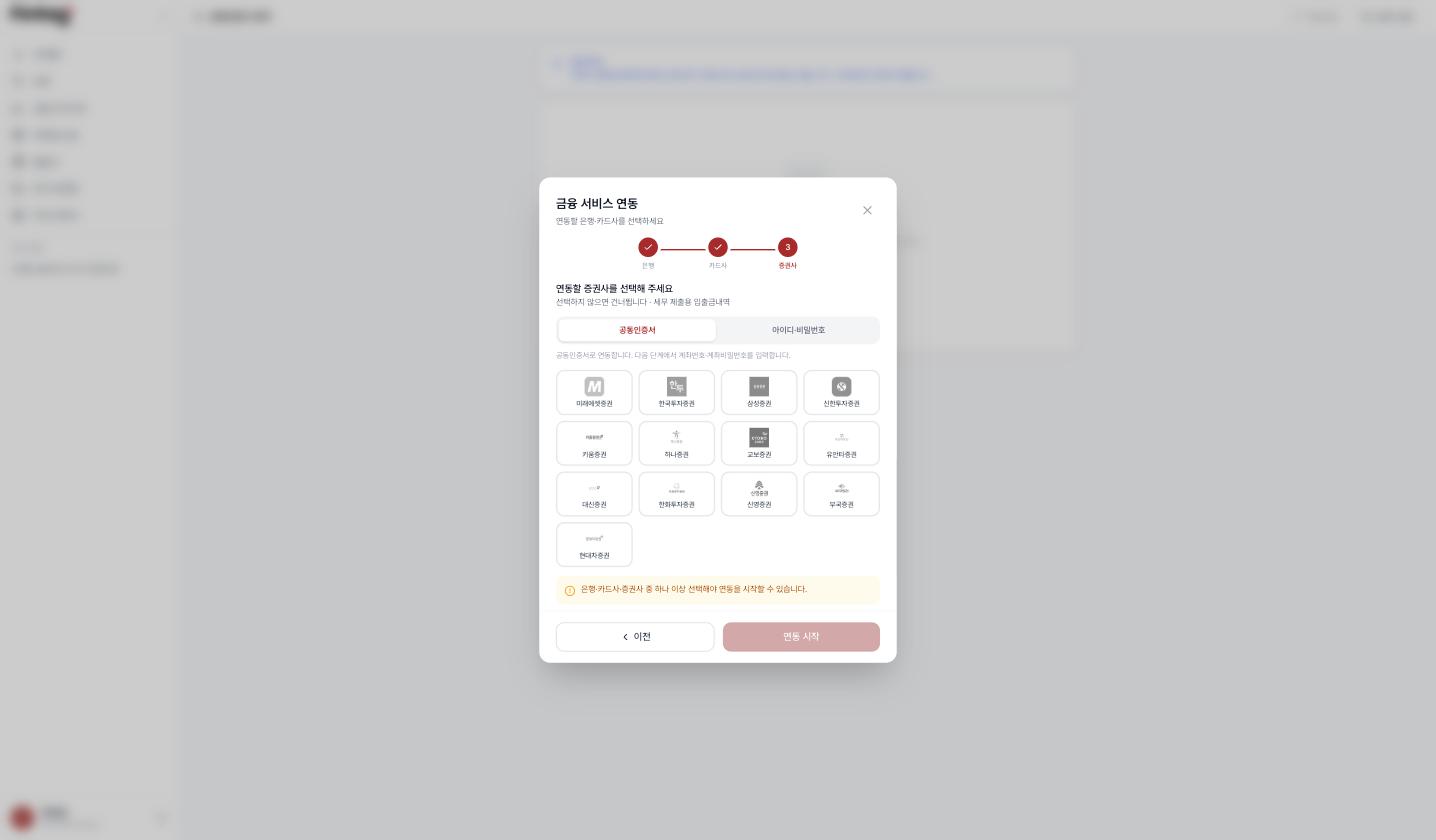
Step 5. Select securities firms — if you have investment accounts, select them too and press Next
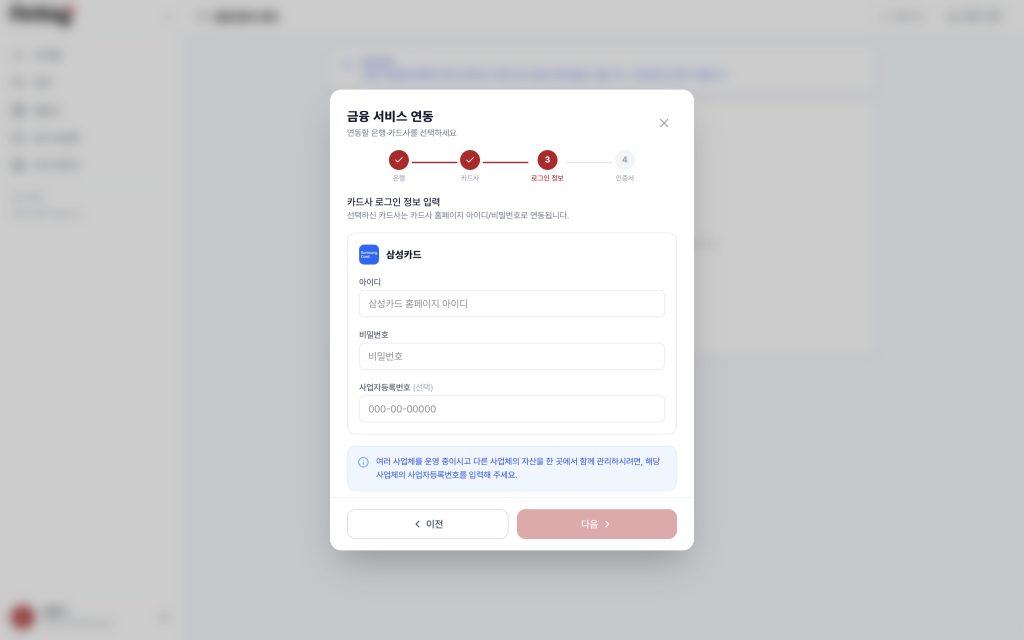
Step 6. Enter ID login details
- Some institutions such as Samsung Card and Hana Card do not support digital certificates. In that case, use the [ID·Password] tab at the top of the card/securities selection step to link with the ID and password for that institution's website.
- If you run multiple businesses, you can enter business registration numbers to manage them separately.
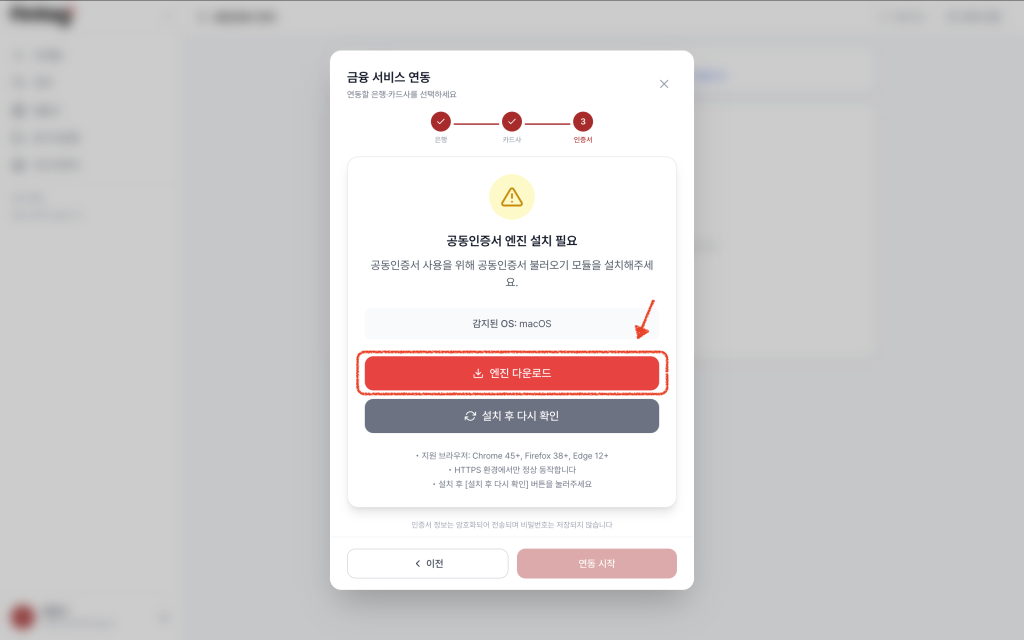
Step 7. Install the certificate engine — press Download engine to install the security engine.
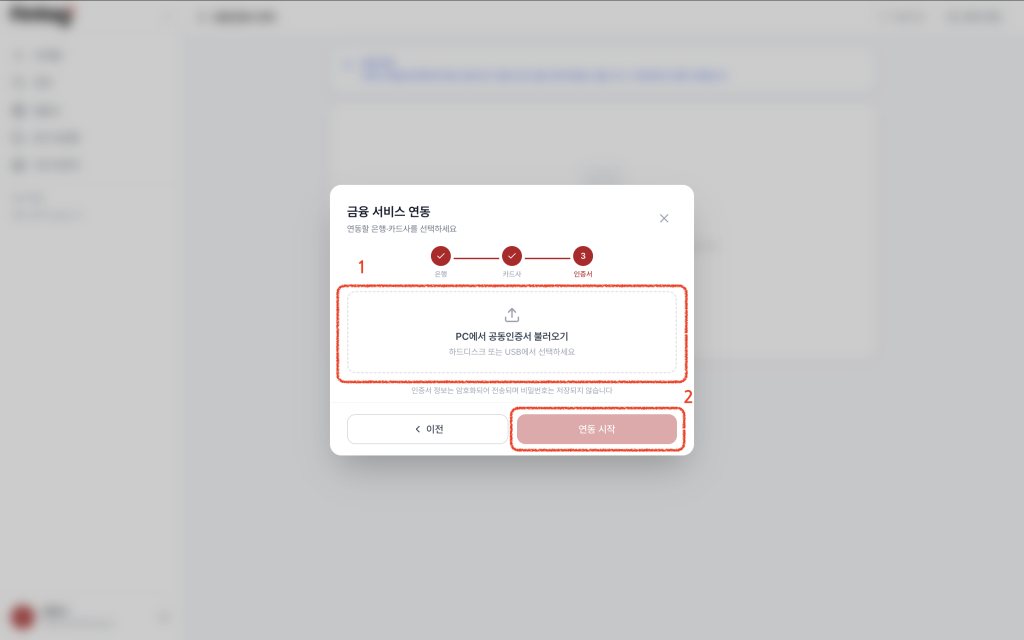
Step 8. Load your certificate
- Press
Load certificate from PC, select the certificate file (.pfx/.p12) from your computer or USB, and enter the certificate password - Click [Start Linking]
After linking
- After you press [Start Linking], assets are collected in the background with a progress notification at the top. Once data import finishes, AI training follows, and each stage completion is announced by a notification.
- After that, data is refreshed automatically every day at a set time. If you need an immediate update, press Refresh on the assets screen or in Certificate Management.
- Cards show linking status / linked date / number of accounts and cards, along with the registration time and the available lookup period per account.
- When a certificate is close to expiry, a warning banner appears. Link again with a new certificate.
Caution when unlinking
Pressing [Unlink] shows a two-step confirmation. If you confirm, all financial data collected through that certificate (deposits, loans, cards, securities, transactions) is deleted together. If you just need fresh data, use Refresh instead.
Features by screen
This section covers the main screens accessible from the left sidebar (bottom tabs on mobile).
Home dashboard
The first screen you see after logging in. Click the logo in the sidebar to return here at any time.
Dashboard (top)
The top of the home screen is where you grasp key financial indicators at a glance and interact with Fintag AI quickly.
- Summary KPIs: connected assets (accounts and cards), last month's average balance, and missed investment income from idle funds
- Quick actions: the default [Shortcuts] tab jumps straight to Financial Insights, the daily briefing, cashflow & anomalies, the calendar, and the how-to guide; buttons in the other tabs (Asset lookup · Report generation, etc.) send a question to Fintag AI instantly
- Fintag AI input: type a question and press send — you move to the chat screen and analysis starts immediately
Dashboard (bottom)
The lower dashboard is a space where you choose and arrange information cards.
- Enter edit mode: the [Edit dashboard] button at the bottom right (admin permission required, PC only)
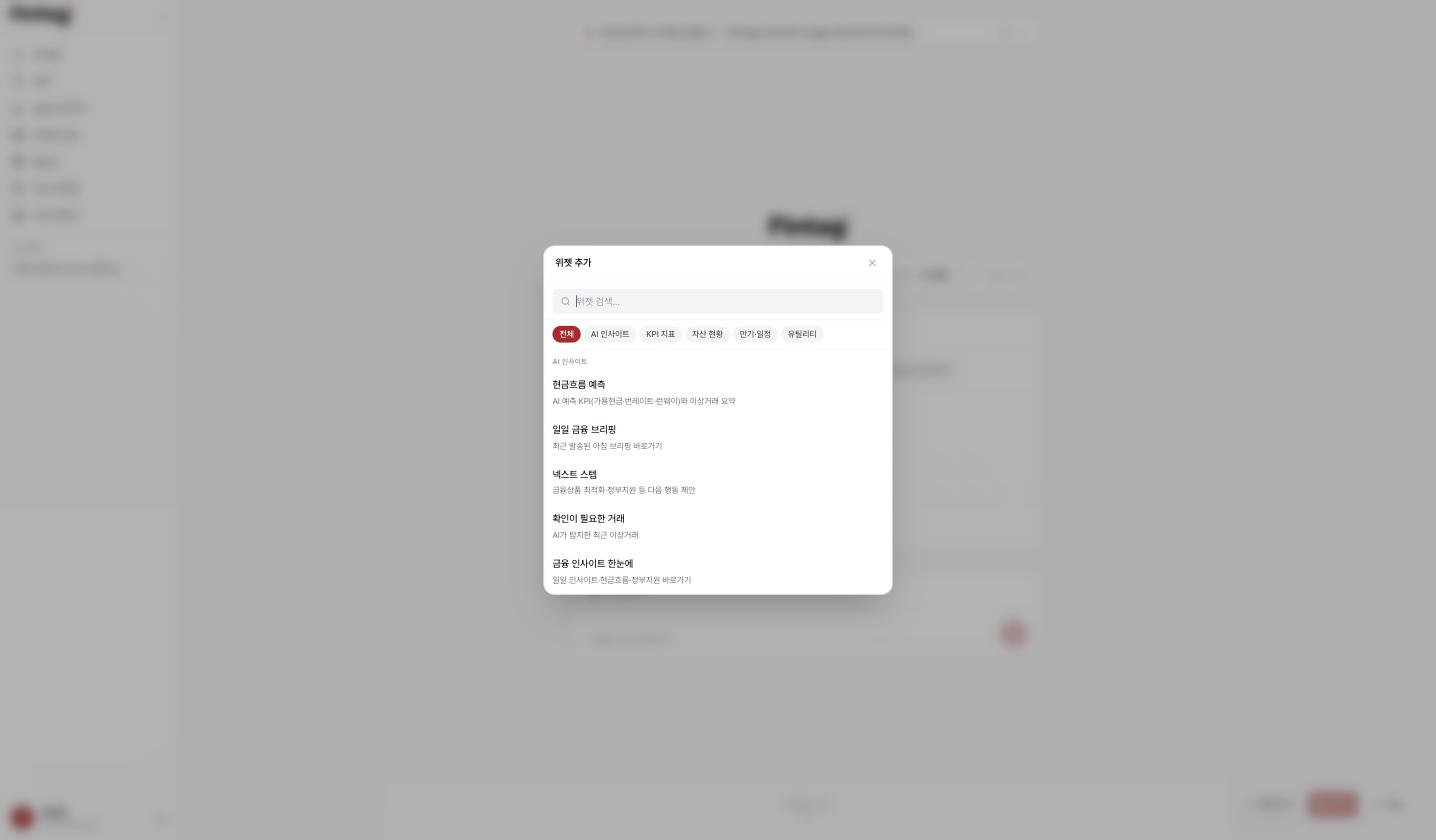
- Add widgets:
+ Add widget→ choose from AI Insights (Cashflow forecast, Daily financial briefing, Market indicators, Next steps, Transactions to review, Insights at a glance), KPIs (Total assets, Total liabilities, Net assets, Debt ratio), Asset status (Asset distribution chart, Deposit list), Upcoming maturities, Token balance, and more - Move and resize: drag widgets around or pull their corners
- Save: always press [Save] at the top after changes (leaving without saving reverts everything)
- If widget data looks stale, press [Refresh now] to update immediately.
Fintag AI chat
A space to talk with an AI financial assistant that understands both your asset data and your uploaded documents.
[AI Chatbot] in the sidebar starts a new conversation; past conversations open from the AI Chat section below it. (You can also start from the Fintag AI input on Home.)
Usage guide
- During the 2-week free trial after signing up, every chat feature is available without limits. When the trial ends, subscribe to Pro to continue. (See Subscription · Tokens · Coupons)
- For complex questions like "comparative analysis", "strategy", "forecast", or "optimization", the AI reasons more deeply in deep analysis mode. Progress labels ("Searching the web for the latest information", "Analyzing materials to compose an answer") appear before the reply.
- Security note: the security filter that blocks malicious input is always active.
- Token usage: generating answers consumes tokens; deeper analysis may consume more.
Ask it to create a document (automatic HWP generation)
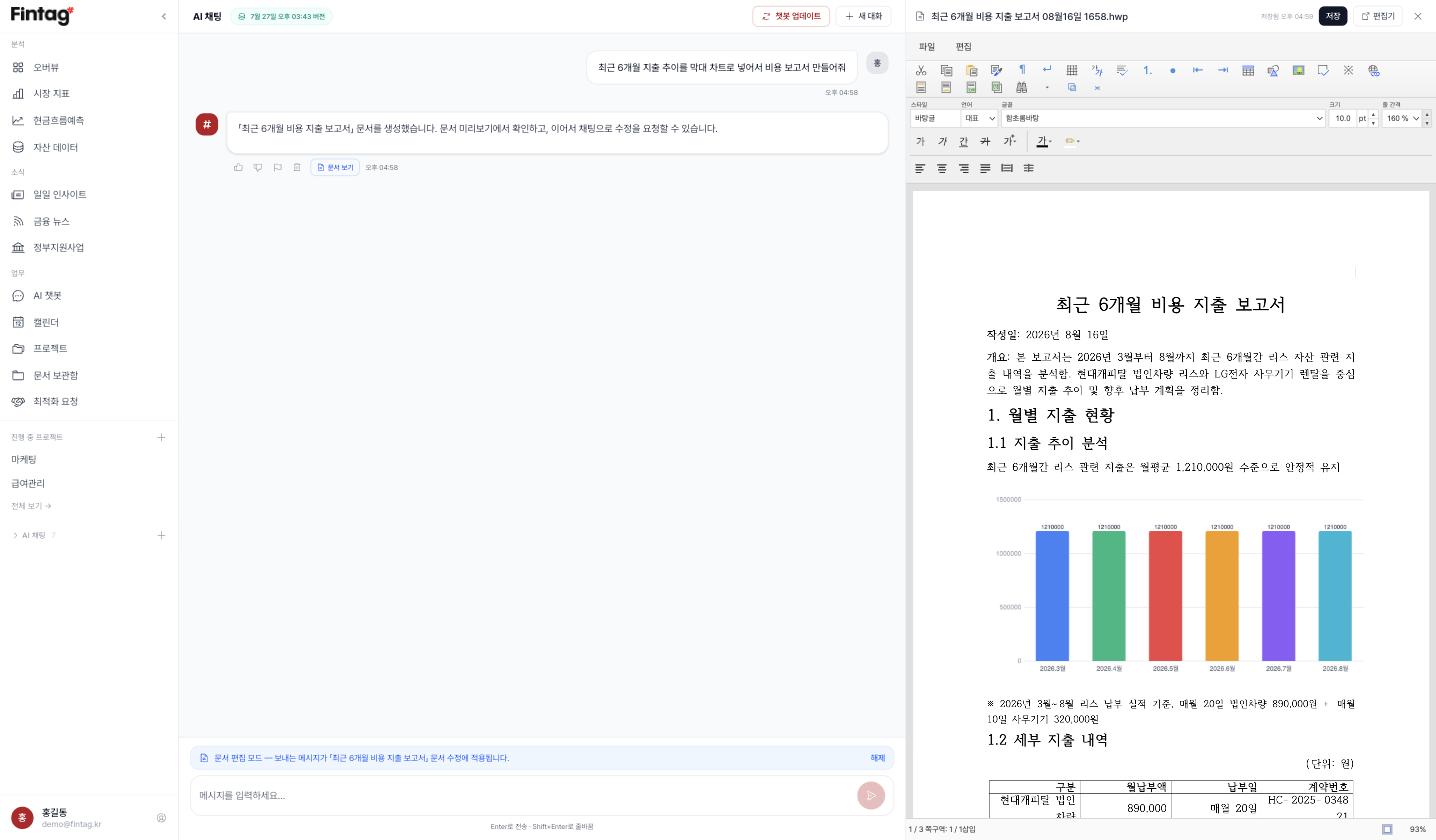
Ask "Create a report", "Draft the meeting minutes", "Write a proposal draft" and the AI produces a Hangul (HWP) document instead of a chat reply.
- When the request is recognized, the chat bubble only shows a short notice and a document preview panel opens on the right (a full-screen view on mobile). [Save] at the top of the panel stores it in the Document Library; [Editor] opens the full editing screen.
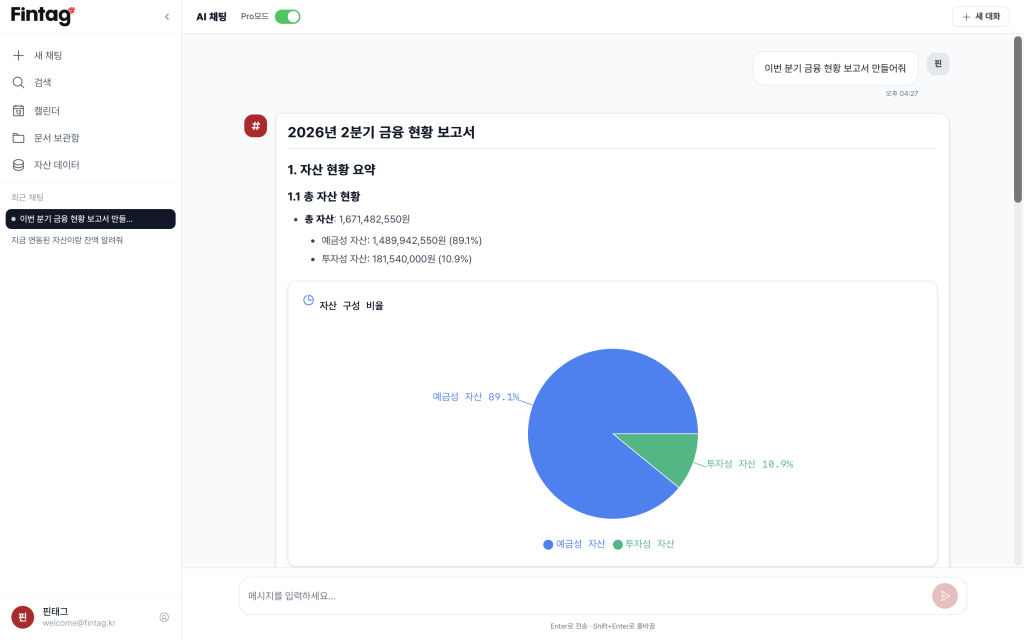
- You can ask for charts and tables. Example: "Create a cost report with the last six months of spending as a bar chart."
- Supported charts: bar · line · pie. Flow diagrams can be included as well.
- Numeric comparisons become tables; trends and composition become charts.
- Keep editing: while a document is open the input box switches to document edit mode — instructions such as "Expand section 3" or "Add a conclusion paragraph" regenerate the document. Press [Release] to return to normal chat.
- Open the finished document in the document editor to polish it, or save it to the Document Library.
Chatbot update (refresh to the latest data)
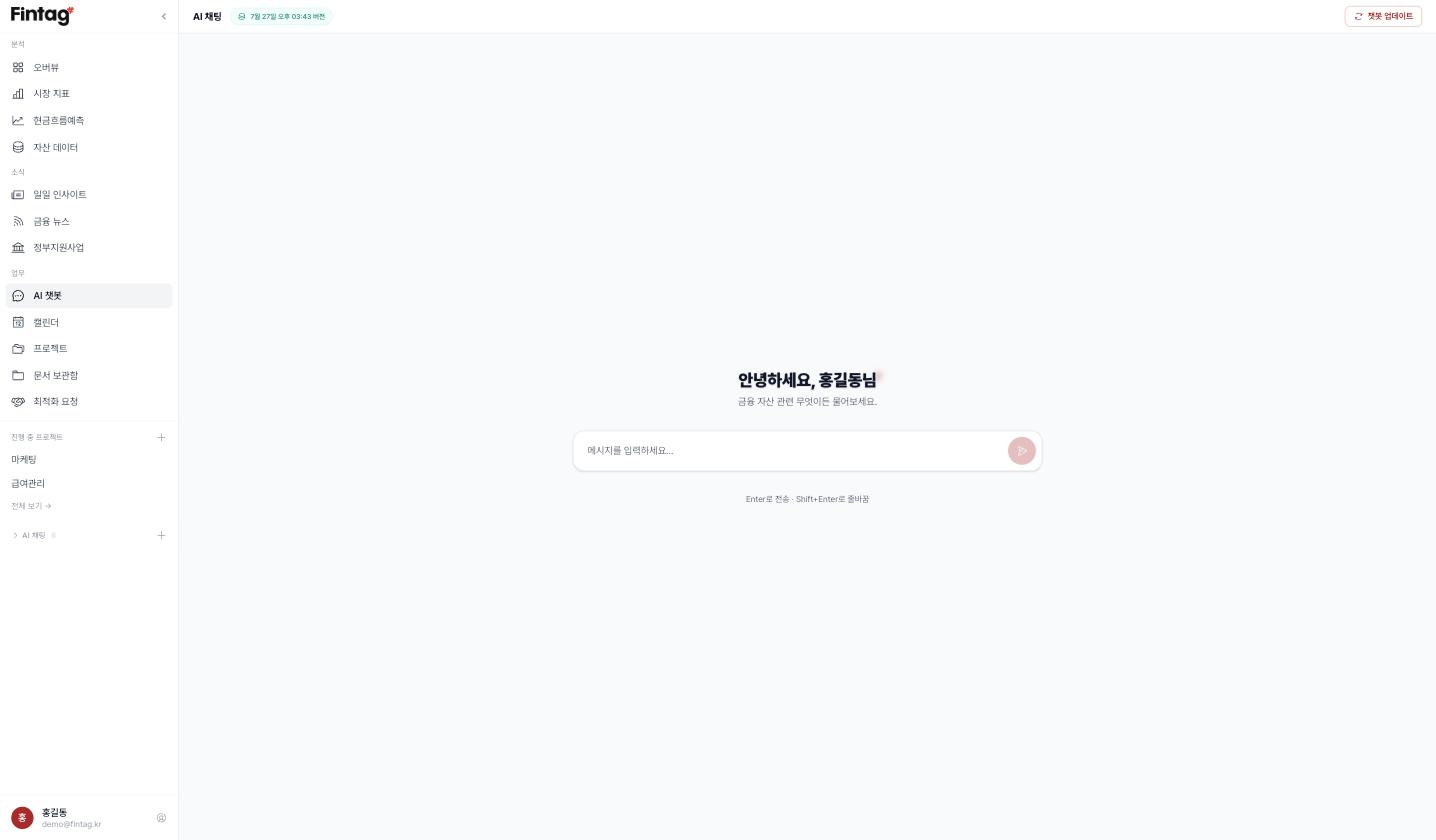
The top right of the chat screen shows which data version the chatbot is answering from.
- Press [Update Chatbot] to retrain on your company's full data (assets and documents). When done, a notification appears and the version label refreshes.
- Click the version label to jump to the Chatbot Library in Documents and see training status in detail.
Sample questions
Example prompts for the Fintag AI chatbot.
※ Answers vary by company because every company's data is different.
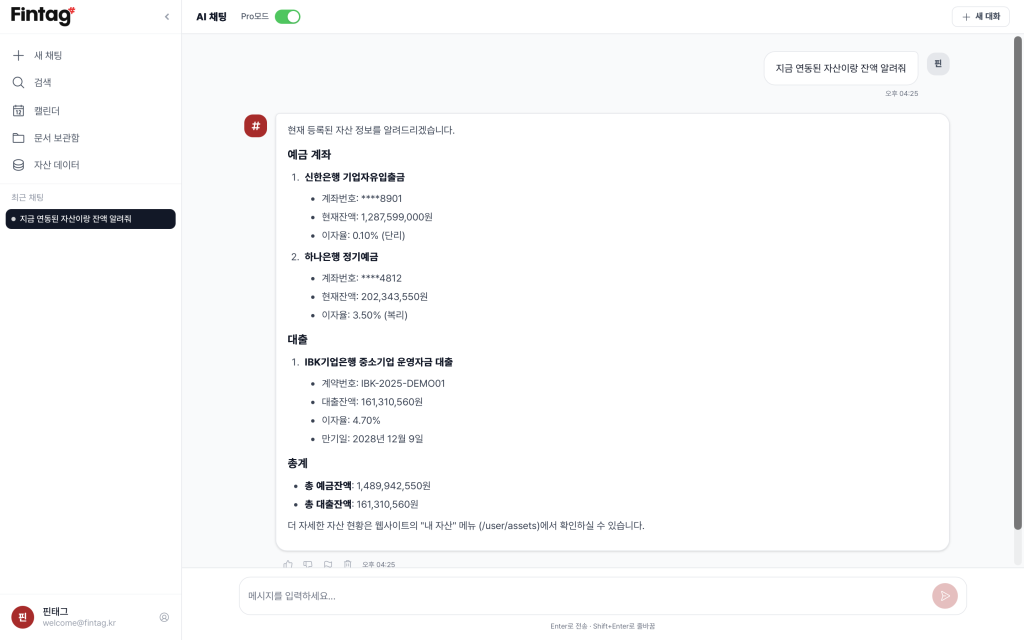
- Asset lookup: "Show me the linked assets and balances."
- Report draft: "Create a financial status report for this quarter. Show monthly spending as a chart."
- Ordinary answers longer than 500 characters can also be sent to the document editor with [Open in editor] and polished into a report.
Reporting errors & token refunds
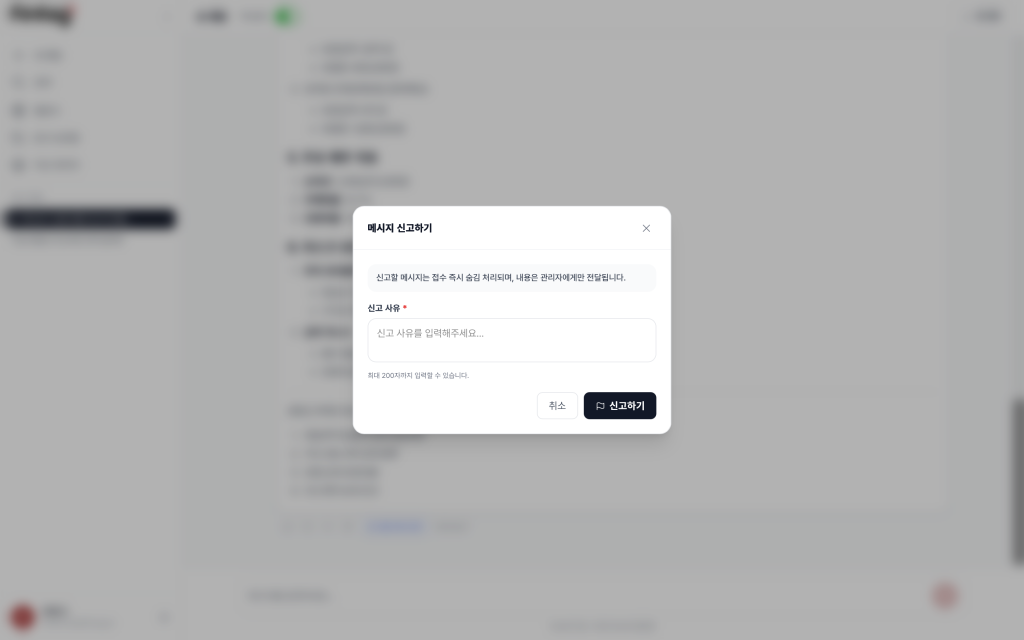
The AI can occasionally get a number wrong or cite the wrong document. When that happens, press the flag (🏴) button under the answer.
- Write the reason and submit — the answer is hidden from the screen.
- After review, an administrator refunds the AI tokens used for that answer.
Financial Insights
One area for your company's financial position and market conditions. Menus in the Analysis and News groups jump straight to the matching tab, and seven tabs at the top of the screen move between them.
| Tab | Sidebar menu | Contents |
|---|---|---|
| Overview | Overview | This week's cash flow summary |
| Market Indicators | Market Indicators | Daily KRX indices, rates, commodities |
| Financial Optimization | (Optimization Request) | Progress of your optimization requests |
| Daily Insight | Daily Insight | Re-read the morning financial briefing |
| Cash Flow Forecast | Cash Flow Forecast | Balance projection and anomaly detection |
| Government Support Programs | Government Programs | Programs matched to your company |
| Financial News | Financial News | Daily financial and economic news |
Overview
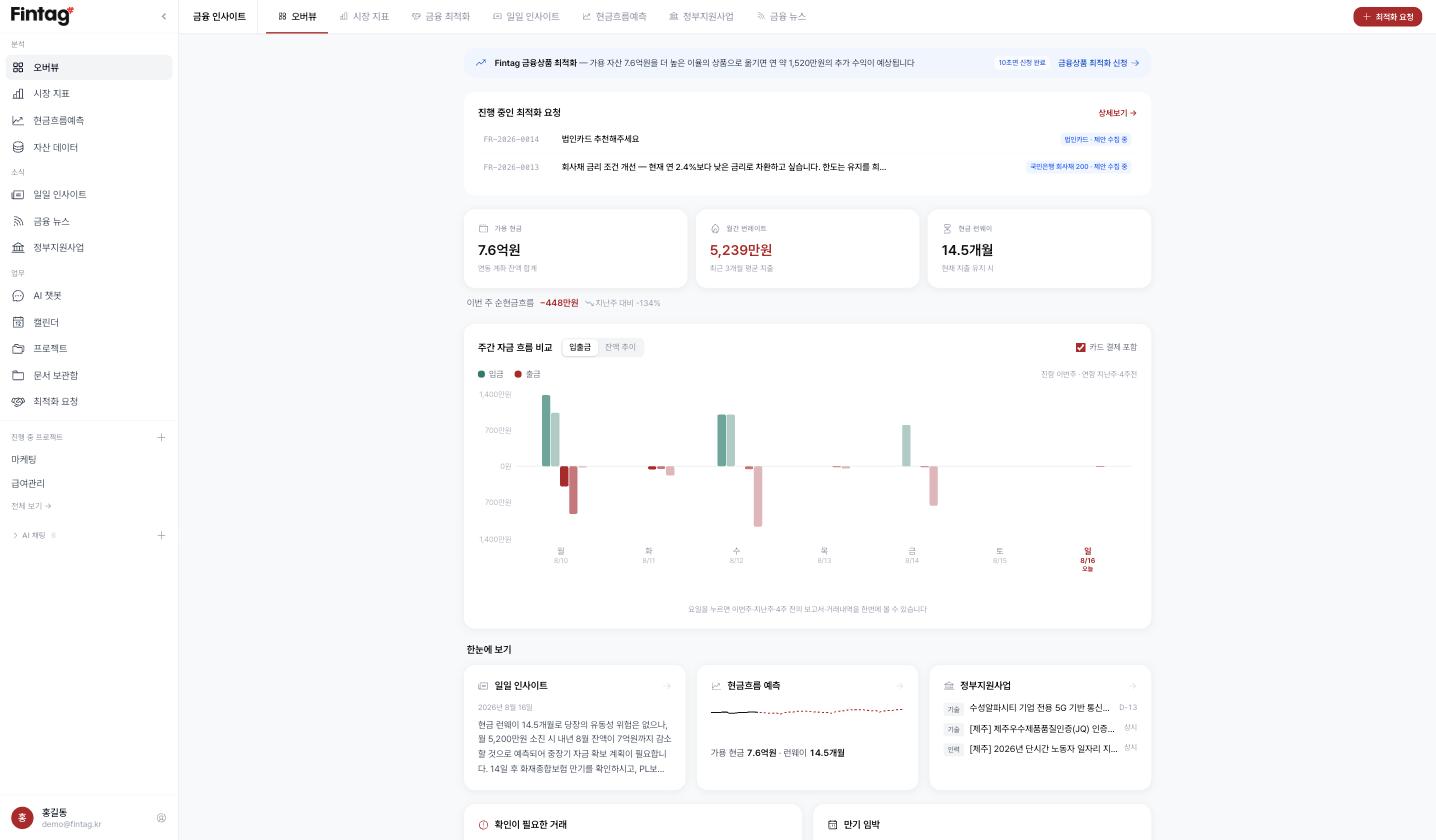
This week's cash movements summarized on one screen.
- Key metrics: available cash · burn rate (monthly net spend) · runway (how long you can operate at the current pace)
- Weekly cash flow comparison: this week versus last week, in and out plus balance trend. Click a bar to jump to that day's transactions.
- At a glance: previews of the other tabs; click to open them.
- Signal feed: items that need attention now — upcoming maturities, large expenses — shown as cards. Click one to jump to the related transaction or asset.
- Next steps: the AI suggests the best next actions
- A market indicator summary appears at the bottom of the screen.
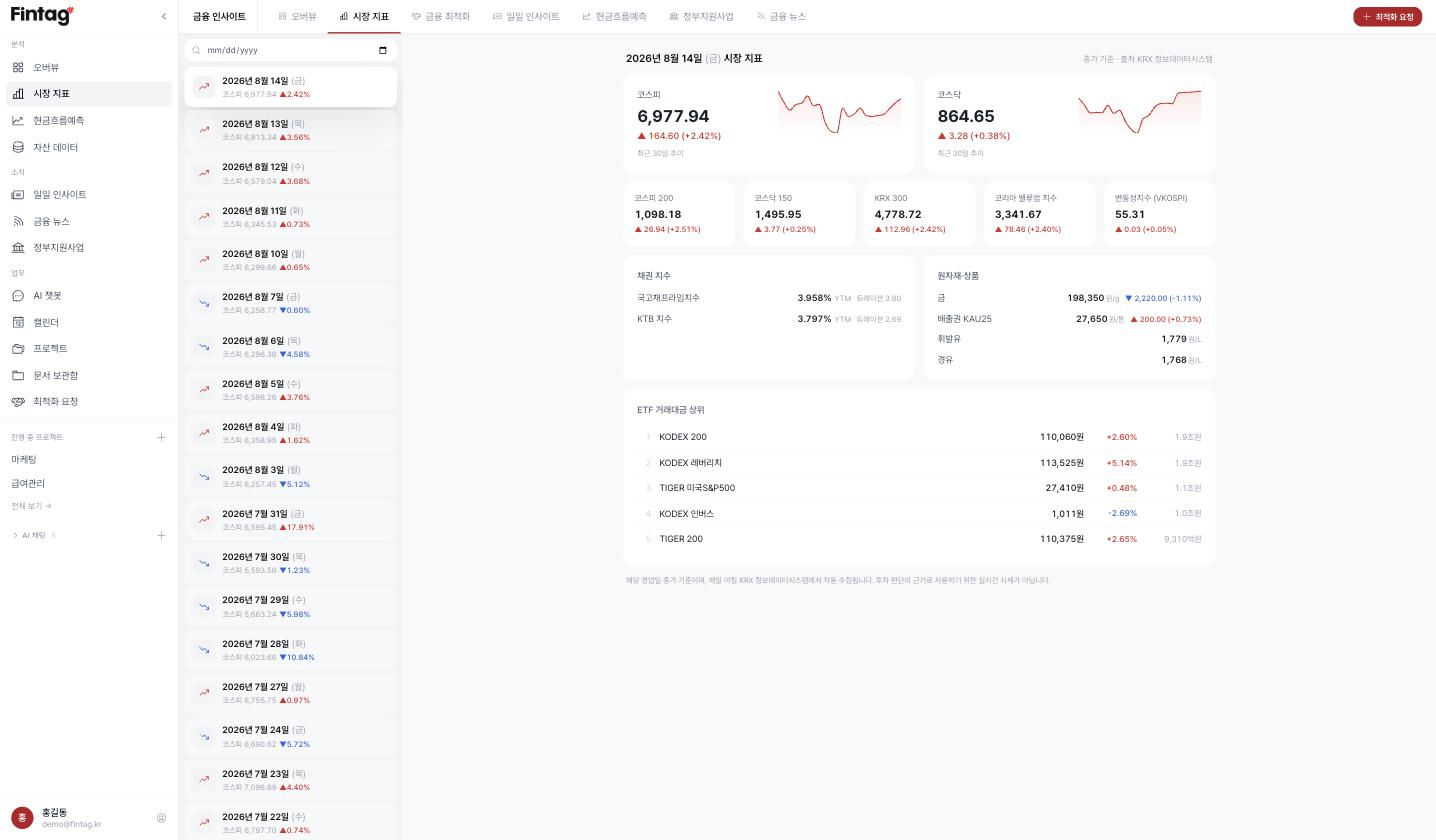
Market Indicators
Daily Korea Exchange (KRX) market data, collected every day.
- Major indices: KOSPI, KOSDAQ, and others with closing prices and changes
- Bond yields · commodities · top ETFs by trading value, all in one screen
- Choose a date on the left to view that day. On market holidays, the previous trading day is shown.
- Market indicators also appear as a home dashboard widget and in the morning briefing email.
Financial Optimization
Track the progress of submitted optimization requests and review incoming proposals. See Optimization Requests below for how to apply.
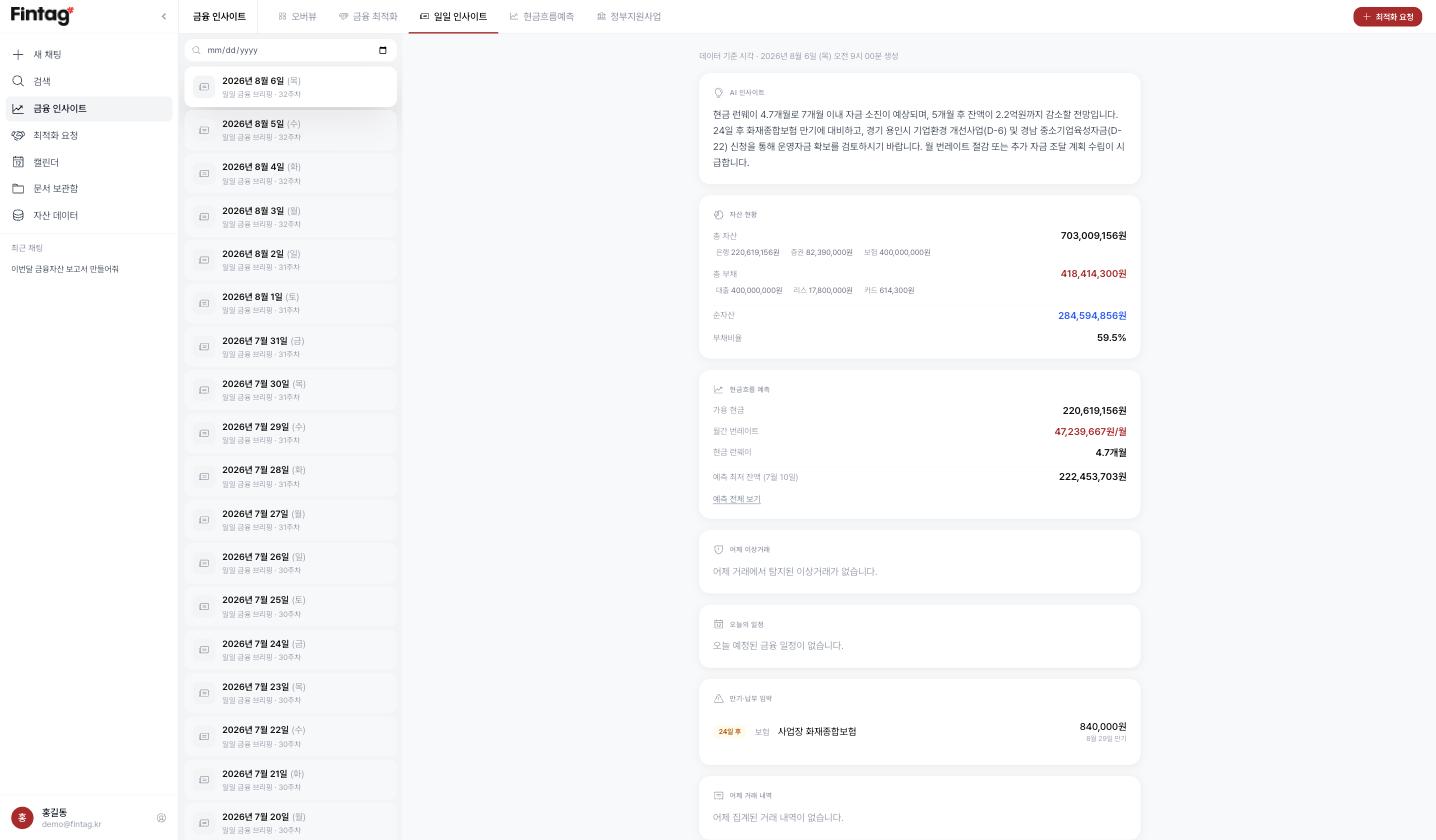
Daily Insights
Re-read the daily financial briefing on the web, with past briefings browsable by date. (See Financial Briefing below for how to subscribe.)
Cashflow Forecast
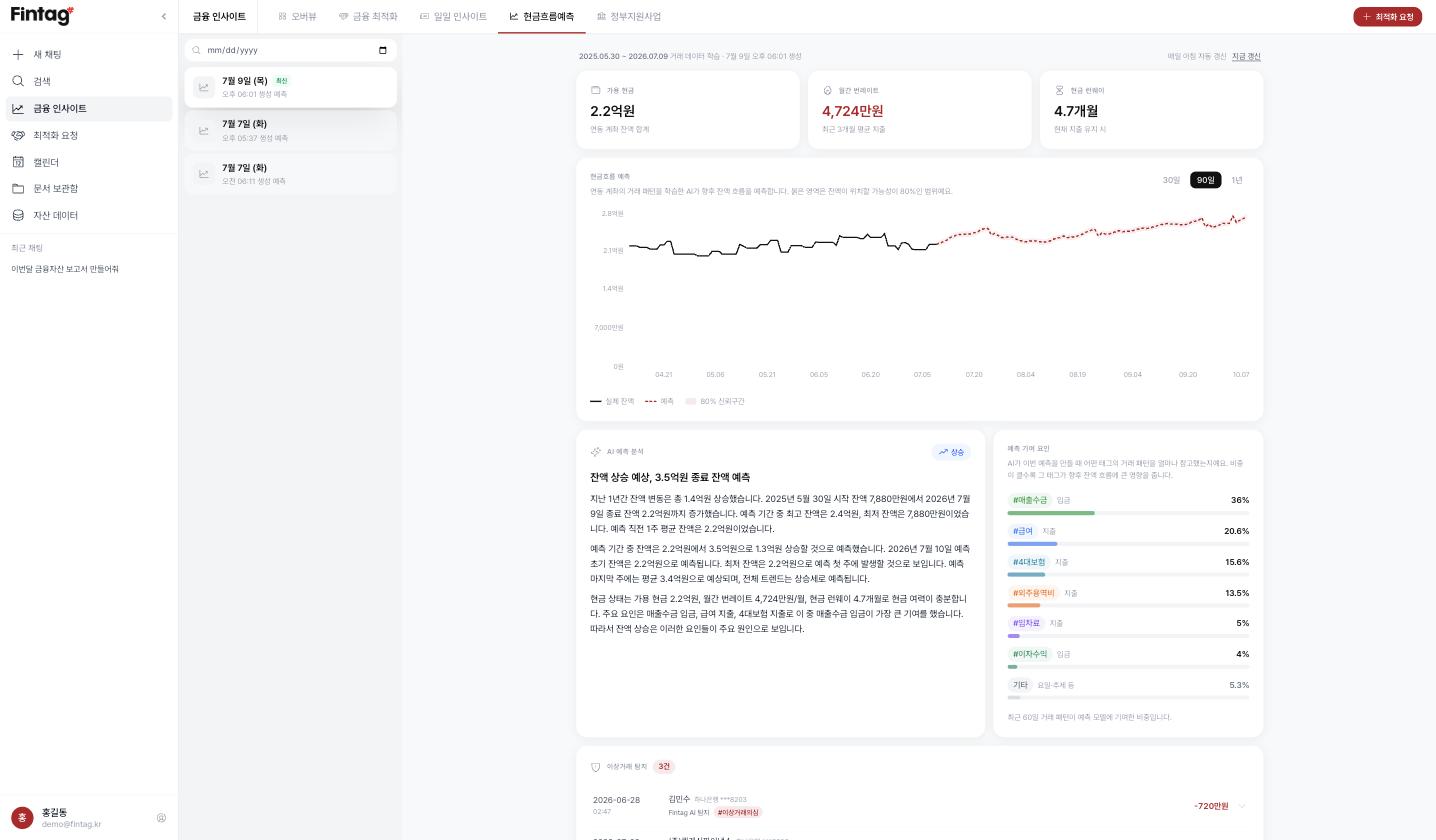
The AI learns your transaction patterns to forecast future cashflow and automatically detect unusual transactions.
- First use requires agreeing to the AI forecast service terms.
- Three key metrics: available cash · burn rate (monthly net spend) · runway (how long you can operate at the current pace)
- Forecast chart: projected balance trend with the main contributing factors
- Anomalies: transactions that deviate from usual patterns are listed. After checking, press [Dismiss] to clear the ones that are fine.
- The left panel keeps a forecast history by date so you can compare past projections with today's.
- Forecasts run in the background and you are notified on completion. Manual runs are available via the [Run Forecast] button.
Government Programs
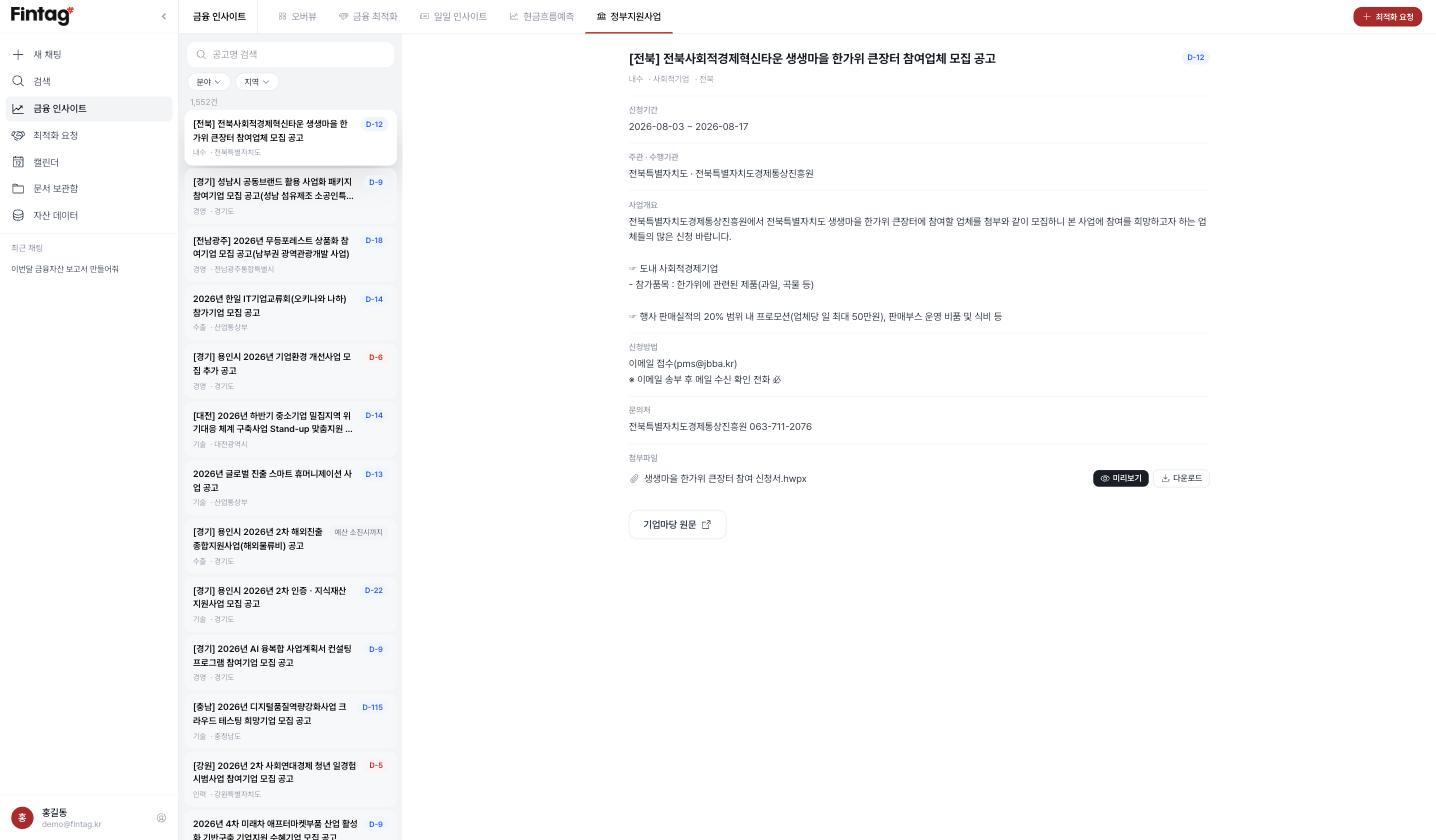
The AI matches government support program announcements to your company's region and industry.
- Pick an announcement on the left to open the details on the right.
- Attached HWP/PDF announcement files preview right on screen, and Open in editor saves them to Documents so you can work on the application.
- You can also ask the AI chat about matched programs. (e.g., "Summarize the programs matched this time")
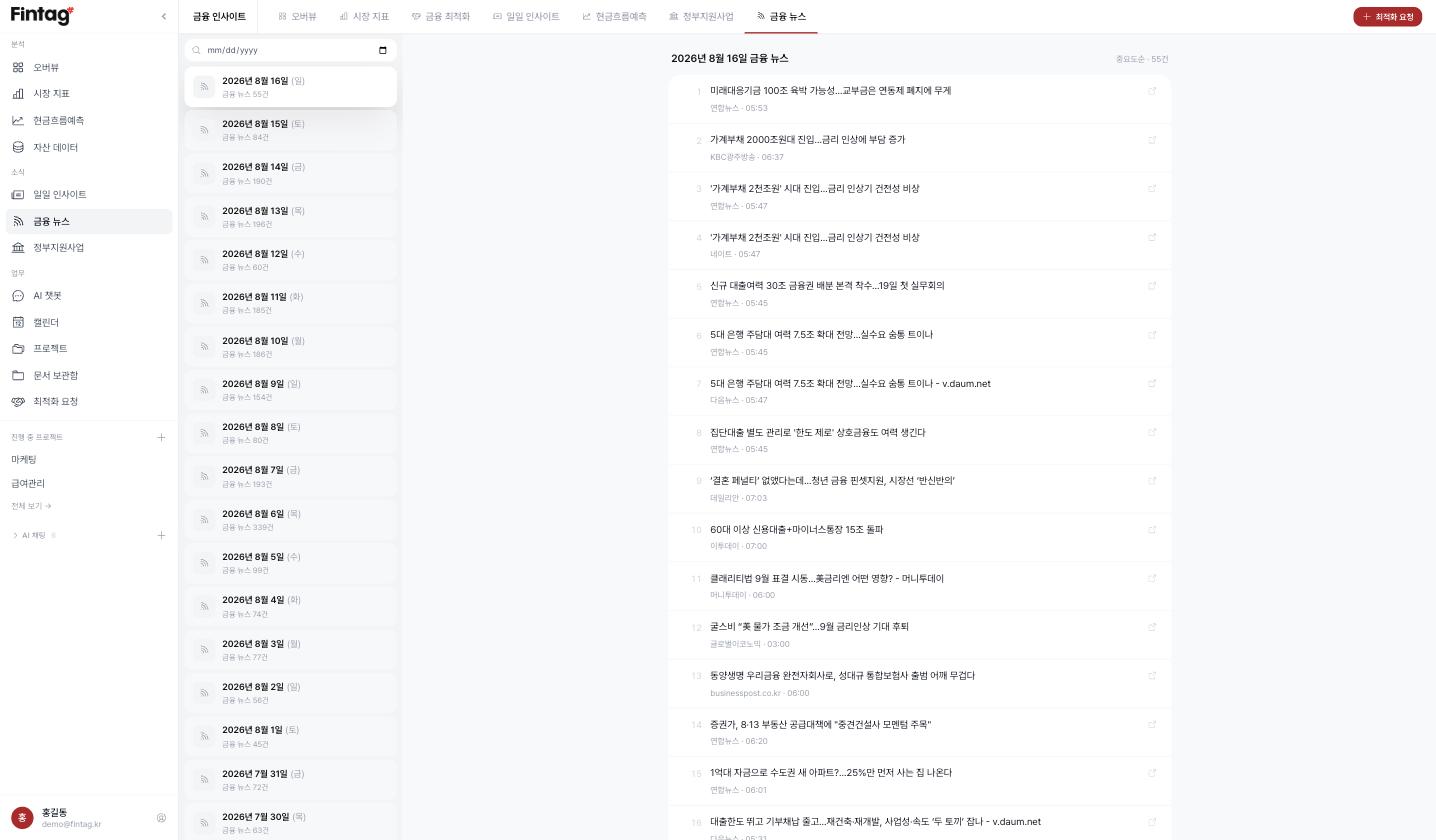
Financial News
Articles from major economic and financial outlets, collected daily and sorted by importance.
- Choose a date on the left to open that day's list.
- Click a headline to open the original article; the source outlet is shown alongside.
- Top stories are also included in the morning briefing email.
Optimization Requests (switch to better products)
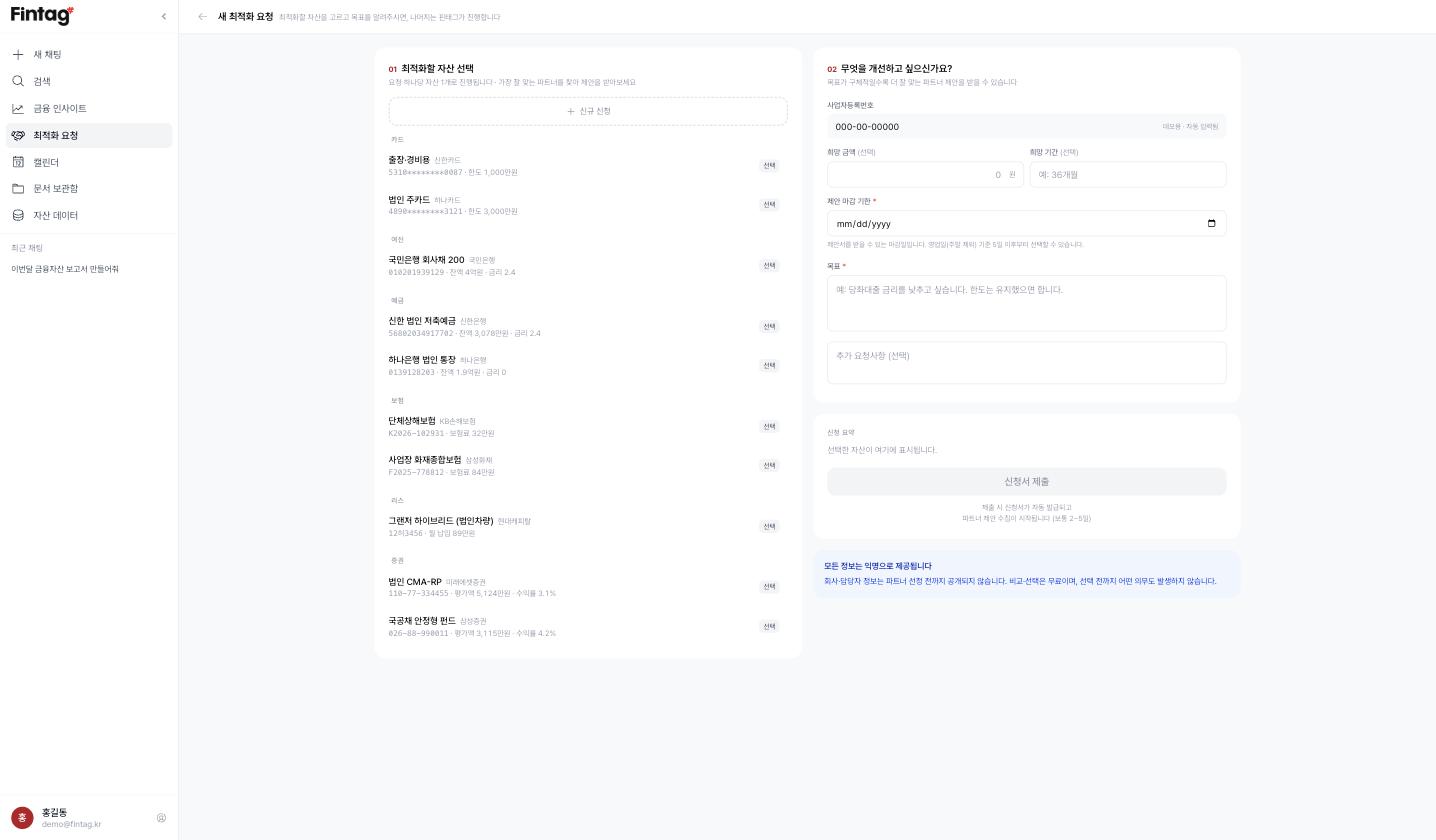
For situations like "I want a lower loan rate" or "our corporate vehicle lease is up for renewal" — receive proposals for products with better terms than what you use now. Enter via [Optimization Request] in the left sidebar, or the button at the top right of Financial Insights.
How to apply
- Pick a linked asset: choose the loan, lease, or deposit you want to optimize and its product details fill in automatically. (You can also apply directly from an asset's detail panel via the [Request Optimization] button.)
- Manual entry: products not yet linked can be entered by hand.
- Write your desired amount, term, and goal (lower rate, higher limit, etc.) and submit.
Progress stages
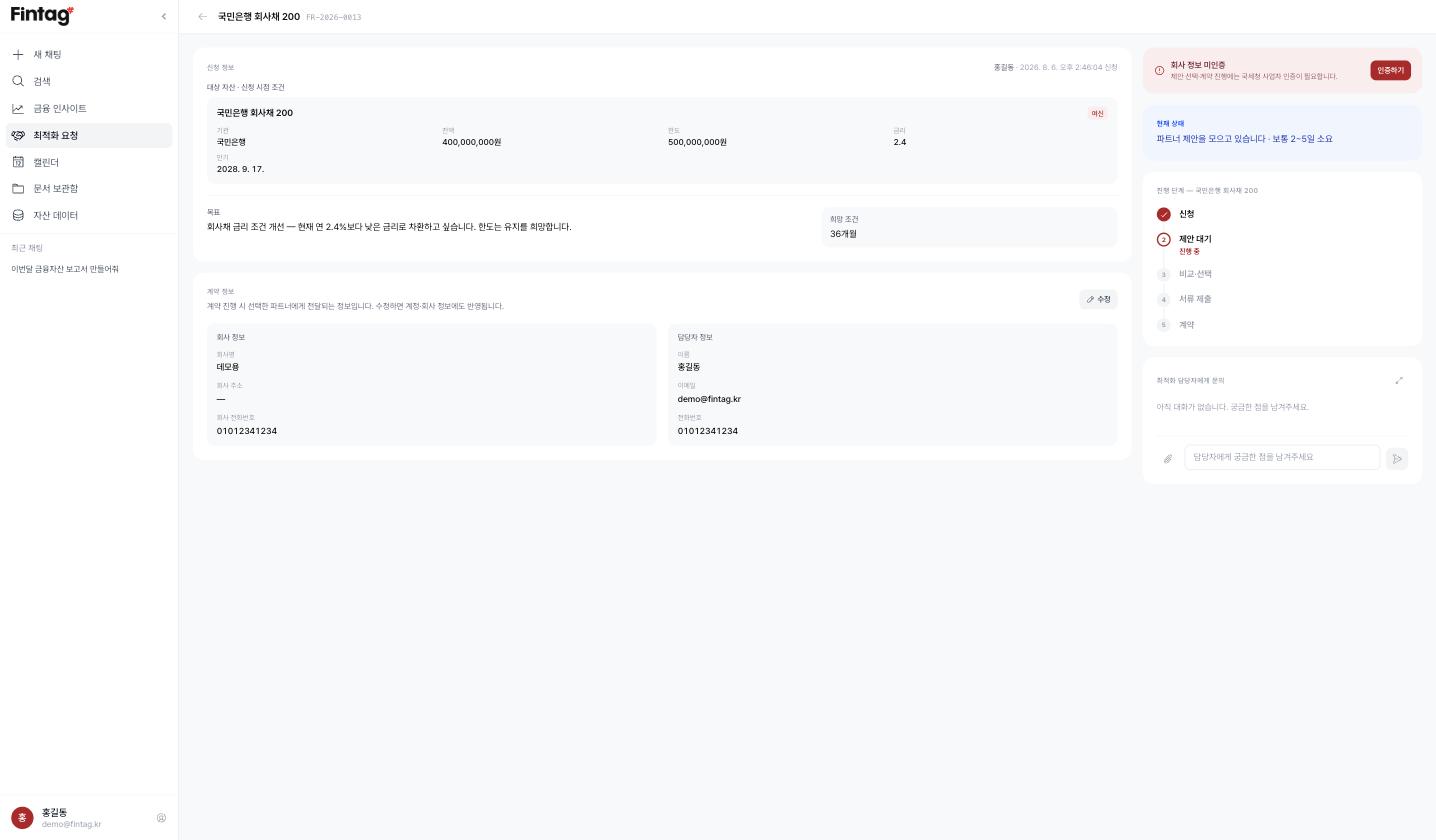
After applying, track progress in Financial Insights → Financial Optimization across five stages:
Apply → Awaiting proposals → Compare & select → Submit documents → Contract
- When partner institutions review your conditions and send proposals, compare them and choose one. Collecting proposals usually takes 2–5 days.
- Selecting a proposal requires business verification (National Tax Service check). Enter the representative's name and the business start date in Account Settings ahead of time.
- After selection, submit the documents the partner requests and proceed to contract.
- Use the comments on the request detail screen to talk with the person in charge.
Financial calendar
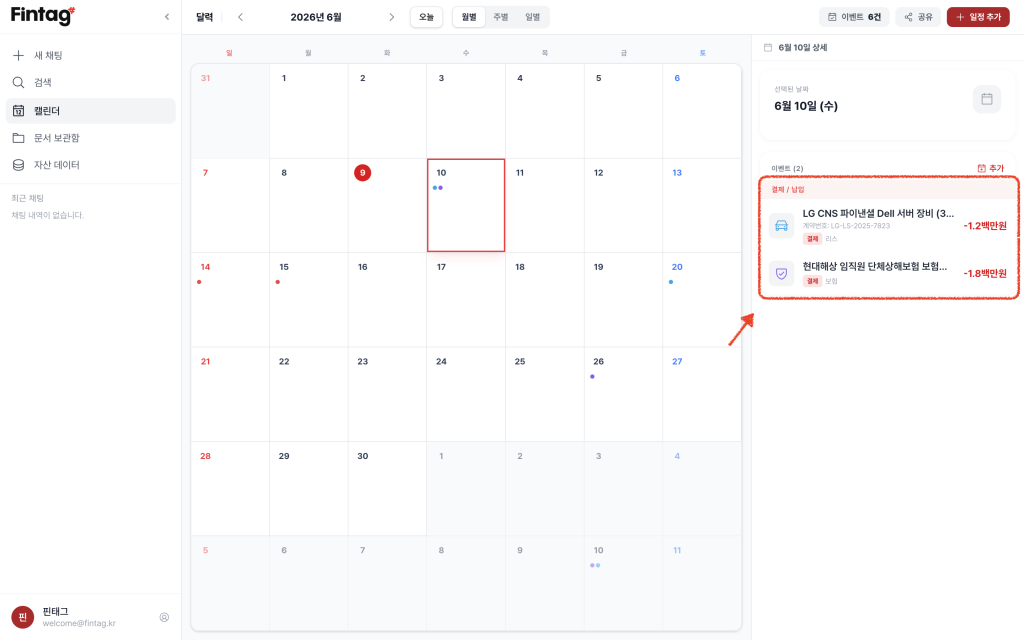
Fintag AI automatically detects payment dates and registers them on the calendar so nothing is missed. The Work tabs at the top move you to Projects and Documents.
Automatic schedule extraction
Loan and savings maturities, card payment dates, and more appear automatically via certificate linking. (Read-only)
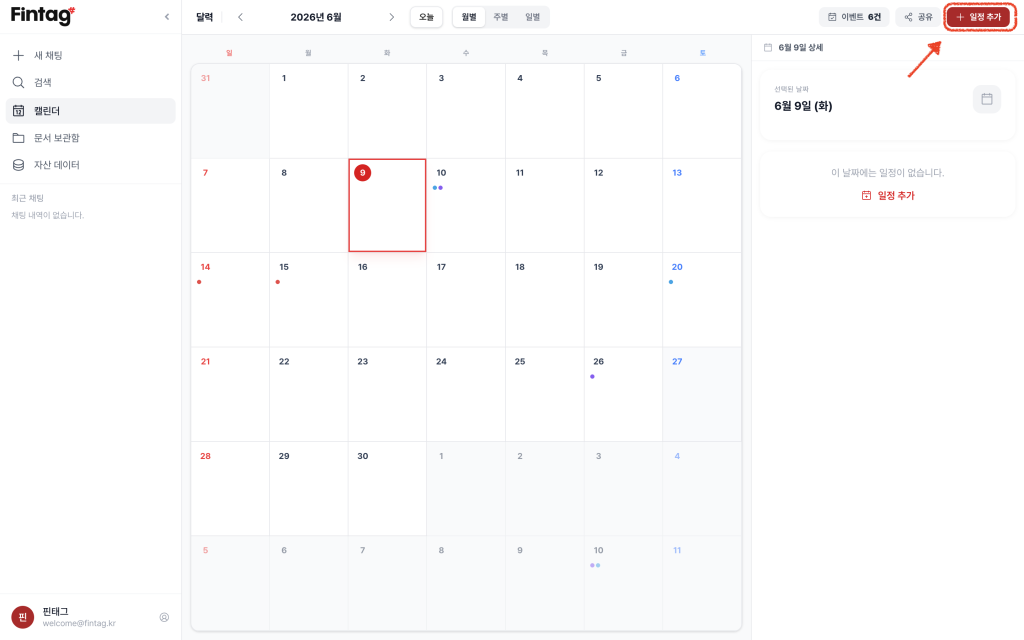
Adding events manually
Use
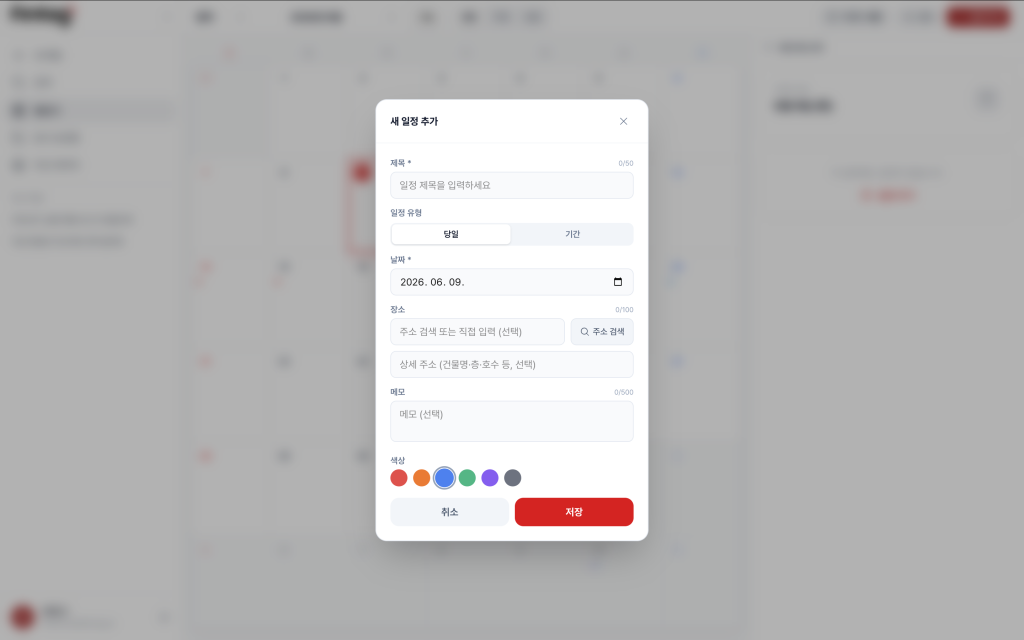
+at the top right to add tax payments, payroll dates, and more.
Fill in the form below to set the event details.
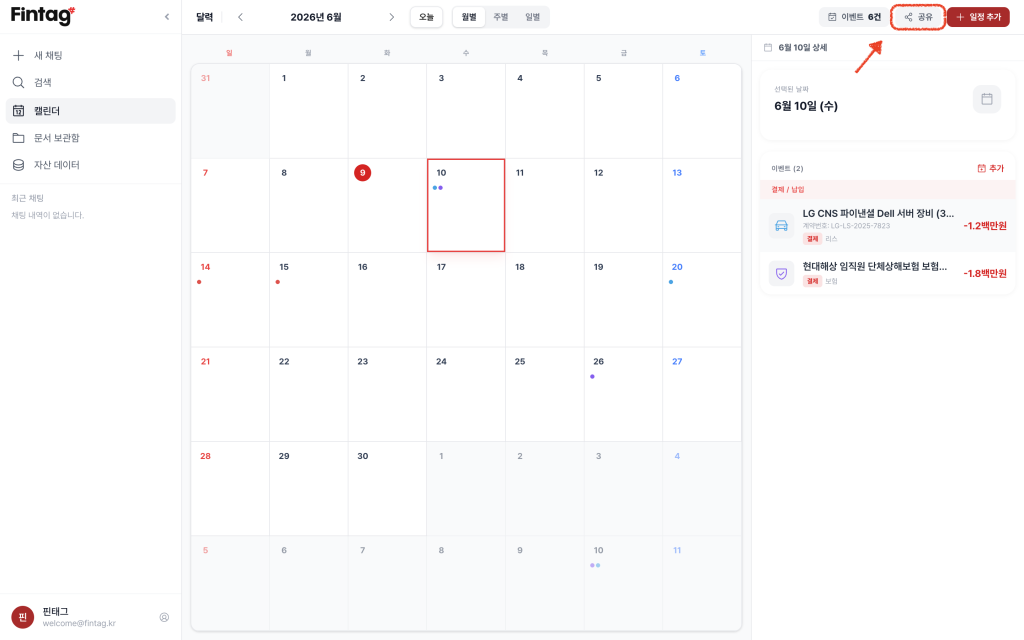
Sharing to external calendars
Use the
Sharebutton to export a link or aniCalfile and see Fintag events in Google/Apple Calendar.
Copy the
iCaladdress and subscribe from your calendar service of choice.
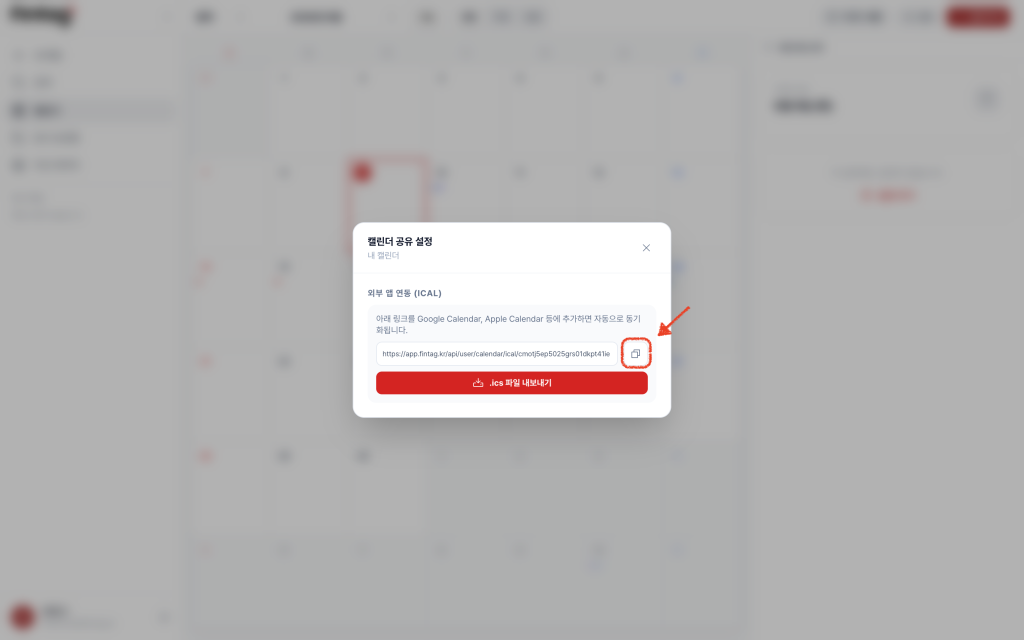
Reissuing the subscription address: if the address may have leaked, press Reissue on the share screen. The old address stops working immediately, and any existing subscriptions must be re-registered with the new one.
Projects (Budget & Cost Management)
Group card and account transactions into a project and manage spending against a budget. Use it when you need to know how much a specific initiative cost — an exhibition, a new product, an office move. Open [Projects] in the sidebar or from the Work tabs.
The core rule — only what you check is counted
- Matching transactions are never added automatically. Only the ones you check in the candidate list become project spending.
- A transaction can belong to several projects at once (shared overheads, for example). Duplicates within the same project are blocked.
- Spending survives the loss of the source transaction. If a certificate is re-linked or the original is deleted, the row is marked "source deleted" and keeps its amount; when the same transaction is imported again it is re-linked automatically.
- Cancelled card transactions are excluded from totals and shown with a cancelled badge. Overseas transactions are counted in KRW.
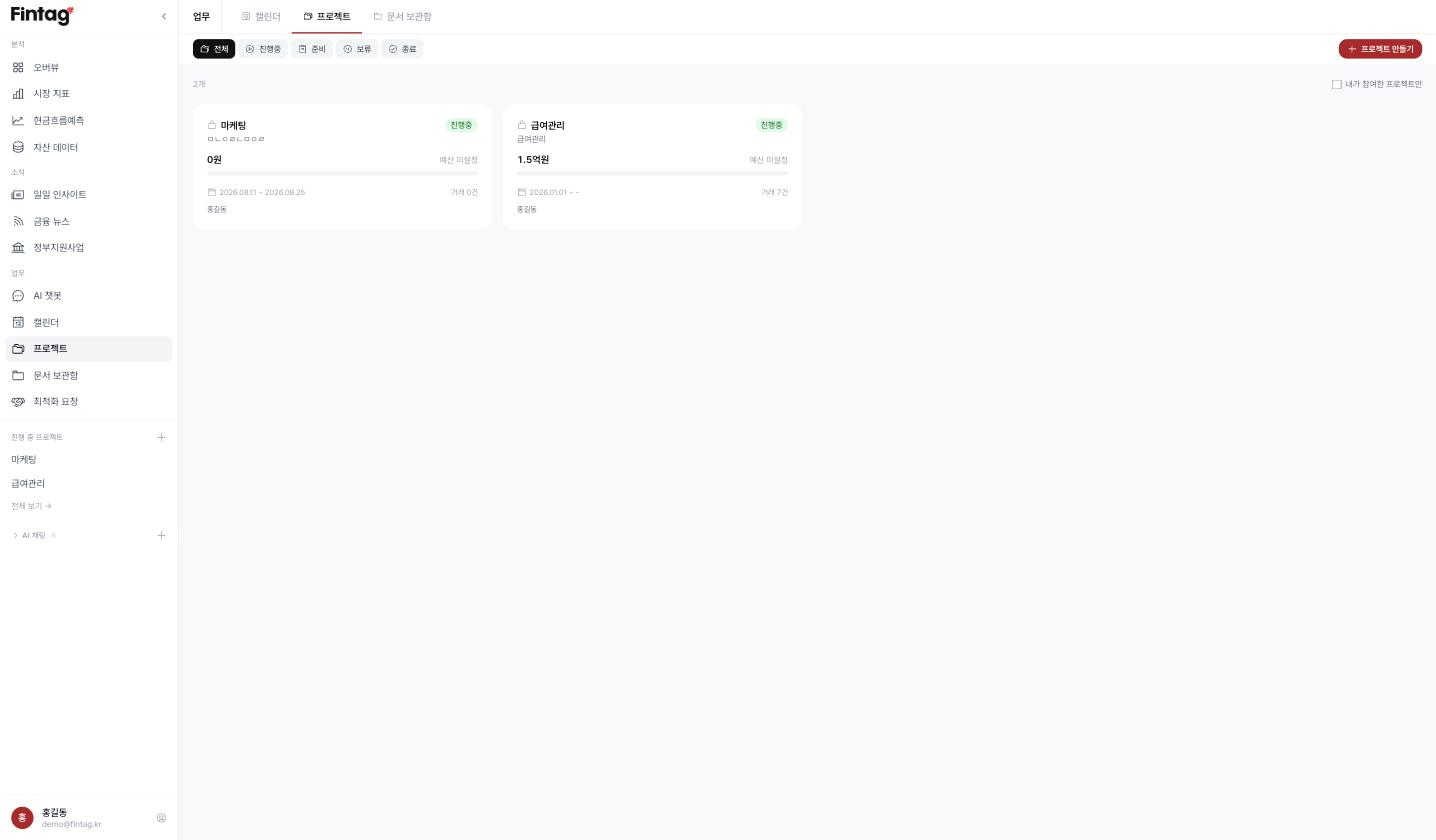
Project list
- Each card shows the budget usage bar, period progress, owner, and status.
- Status is one of Planning · Active · On hold · Closed, filterable with the tabs at the top.
- Only projects I'm on narrows the list.
- Projects over budget or needing attention are badged on the card.
Creating a project (3 steps)
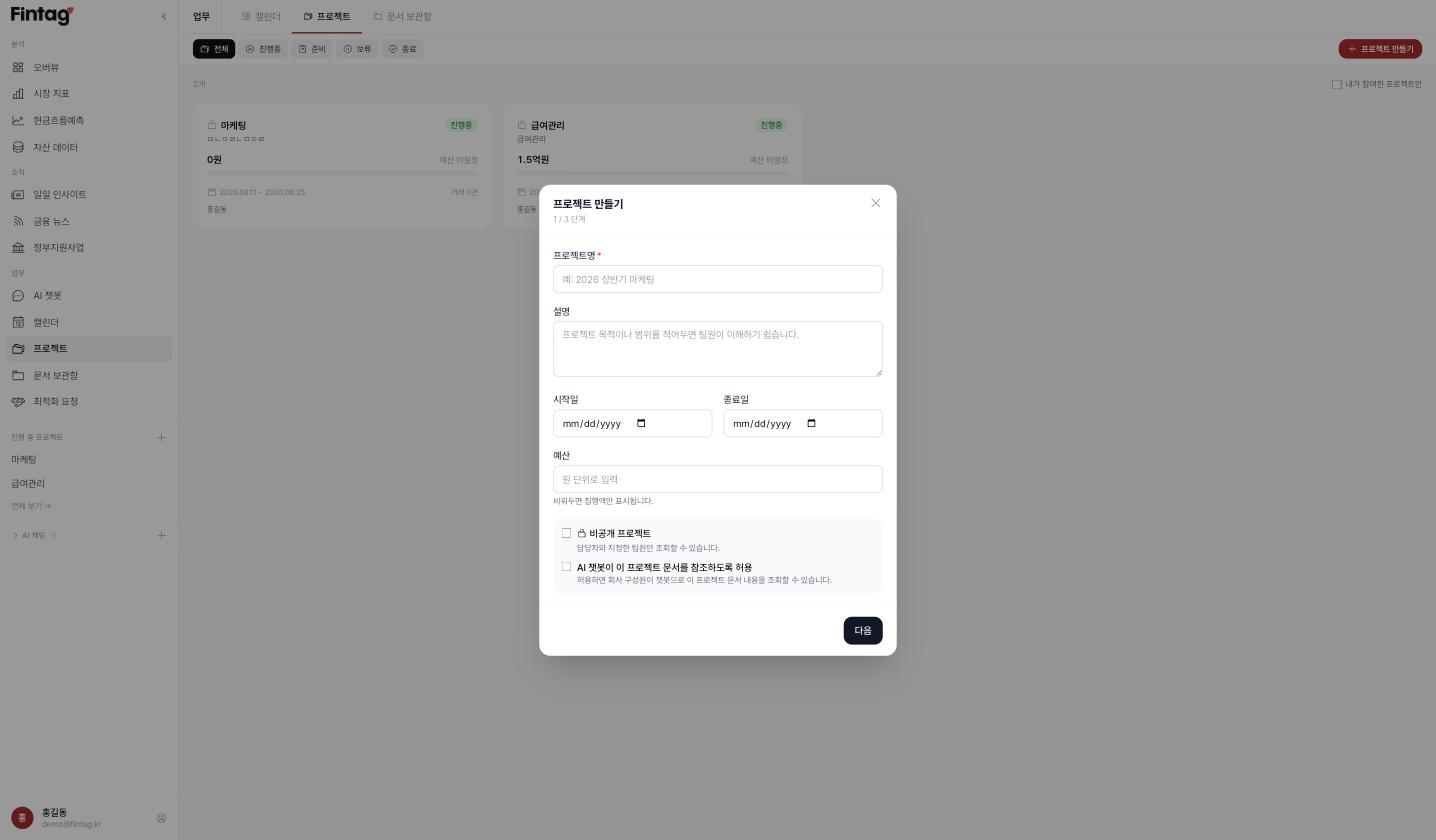
[Create Project] at the top right opens a three-step wizard.
Step 1 — Basic information
- Name, description, period (start/end), budget. Leave the budget empty to track spending only. (Companies with more members also assign an owner and members here.)
- Private project: only the owner, members, and company administrators can see it.
- Allow AI reference: lets the AI chatbot use this project in its answers. Private projects cannot enable it, because any employee could then read the contents through the chatbot.
Step 2 — Transaction filter (cards & accounts)
- Choose the cards and accounts used for this project (required).
- Optional: tags (if none are selected, all transactions on those accounts become candidates), minimum amount, and a start date for the search.
- A tag with the project's name is created automatically.
- These are only search conditions — nothing is counted until you check it in the next step.
Step 3 — Selecting transactions
- Candidates matching the conditions are listed; check the ones to include.
- The number selected and the running total are shown at the top.
- You can also create the project first and add transactions later.
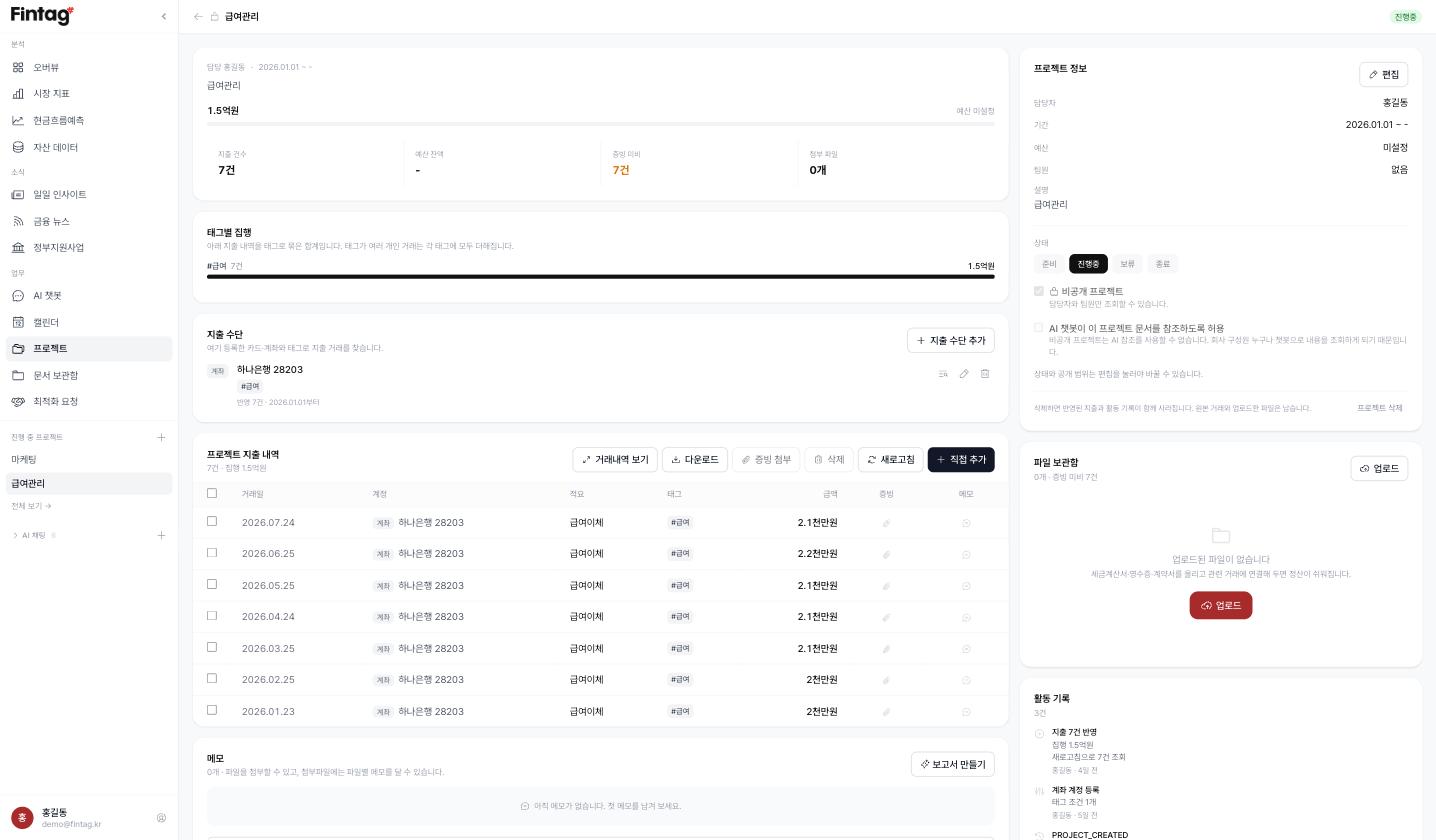
The project detail screen
| Section | Contents |
|---|---|
| Summary | Budget, spent, remaining, usage rate, transaction count, missing evidence count, attachment count. Warns when spending outruns the elapsed period |
| Spend by tag | Totals and share by tag (expense category). A transaction with several tags counts toward each |
| Payment sources | Manage the cards, accounts, and tag conditions this project draws from; adding one widens the candidate pool |
| Project spending | Included transactions (date, account, description, tag, amount, evidence, note). Add/remove, attach evidence, download |
| Notes | A thread for progress updates, with file attachments and [Create Report] for AI-generated reports |
| Project info | Edit owner, period, budget, members, description; change status (Planning · Active · On hold · Closed); private and AI-reference settings; delete |
| File storage | Quotes, contracts, receipts. One document can be linked to several transactions |
| Activity log | Who changed what, and when |
Managing spending
Use the buttons at the top right of the spending list.
- Browse transactions: load candidates matching the conditions and check the ones to include.
- Add manually: enter cash spending or anything else that isn't linked.
- Attach evidence: link documents to the selected transactions — one document can cover several. Transactions without evidence are counted in the "missing evidence" figure.
- Delete: removes a transaction from the project; the source transaction is untouched.
- Download: export all spending, or a chosen period, as
.xlsx. Transactions and notes are written to separate sheets, and evidence is shown by file name. - Refresh: re-reads the latest amount and status from the source transactions.
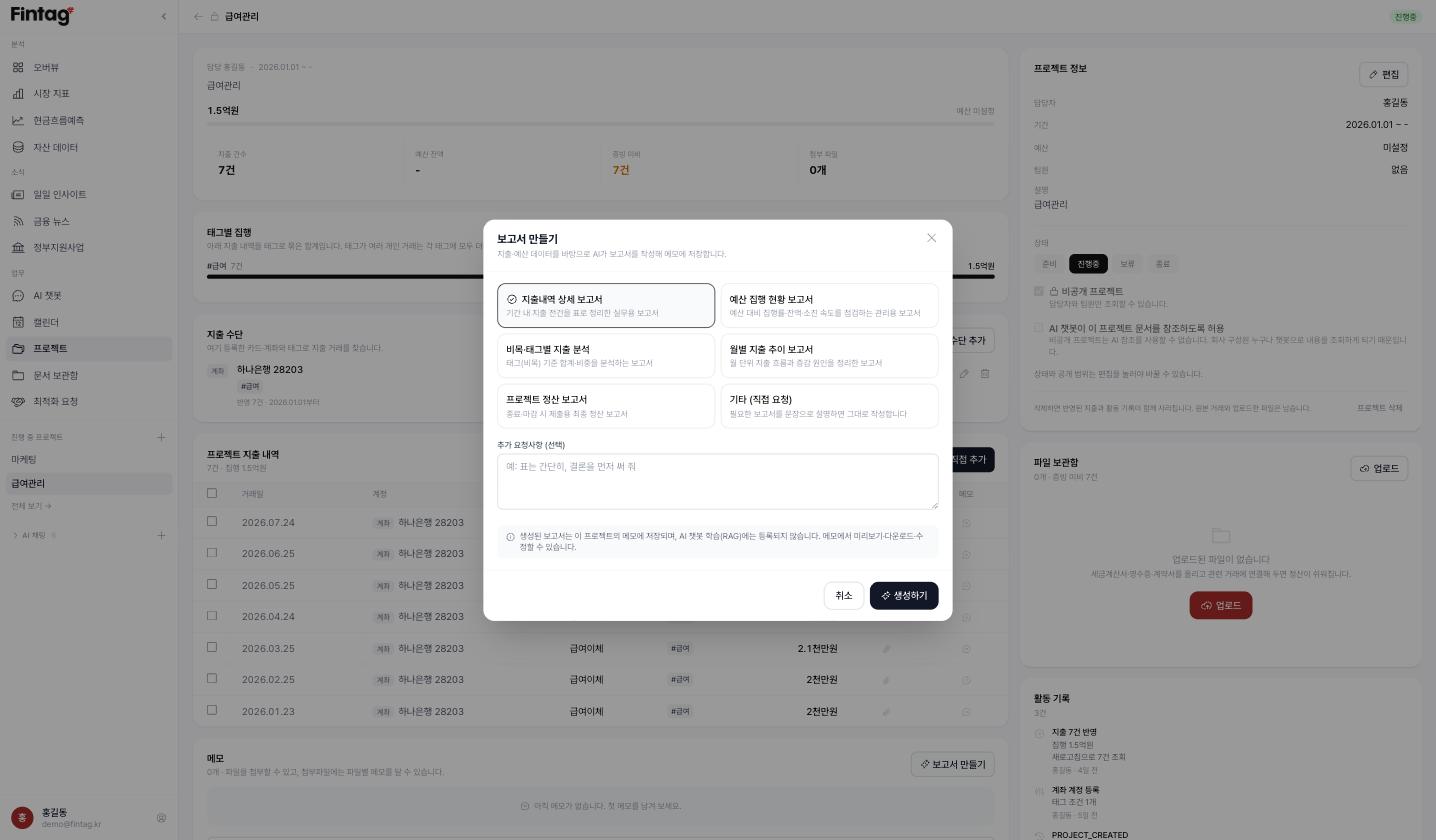
Creating reports (AI)
[Create Report] on the right of the Notes section generates several kinds of report from your spending and budget data.
| Report | Use |
|---|---|
| Detailed spending report | Every transaction in the period, in table form |
| Budget execution report | Execution rate, remaining budget, and burn pace for management |
| Spend analysis by tag | Totals and shares by expense category, with commentary |
| Monthly trend report | Month-by-month flow and the reasons behind changes |
| Project settlement report | Final settlement for closing, including evidence coverage |
| Other (custom request) | Describe the structure you want |
- Add extra instructions to shape the output (e.g. "keep tables short, lead with the conclusion").
- Progress is shown while generating, and you can stop midway.
- The finished report is saved as a project note for the team, where it can be previewed, downloaded, and edited. (It is not added to the AI chatbot's training material.)
- Reports are written from the spending currently included. Add transactions and regenerate for an updated version.
Seeing projects in the sidebar
Active projects appear in the left sidebar with their budget usage rate (%), shown in red once it passes 100%.
Documents
More than simple storage — this space turns company documents into knowledge the AI can read and answer from. The Work tabs move you to the Calendar and Projects.
File storage
Upload and manage all kinds of work documents in one place.
Supported formats: PDF, Excel, Word, HWP, PPT, images (up to 20MB per file)
- Drag and drop files onto the screen or press [Upload] at the top right.
- Check each file's type and size at a glance and manage them as a list.
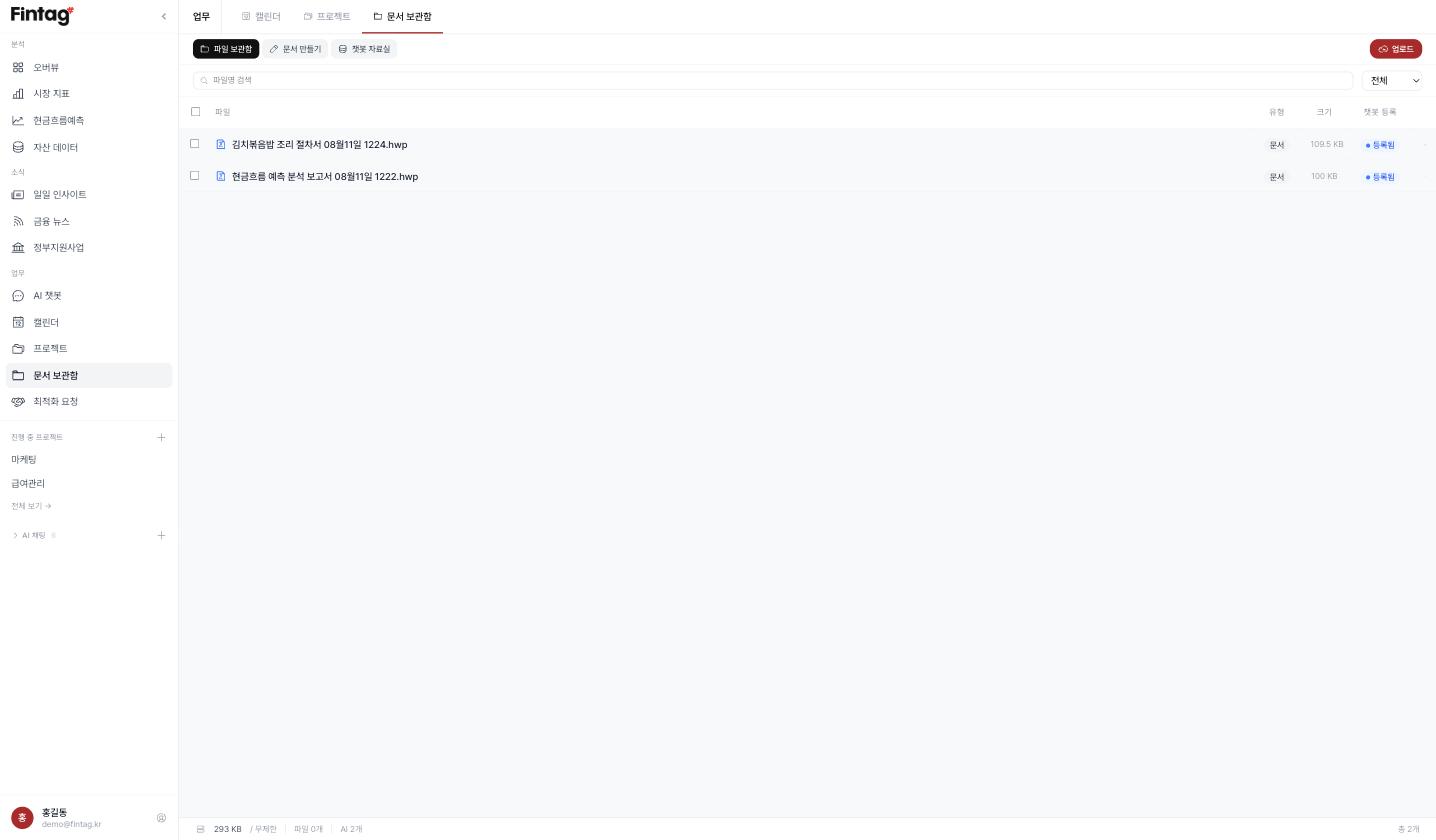
- The right side of the list shows whether each file has been trained into the AI (chatbot registration status).
- Click a file to open its action buttons below the row — register/unregister with the chatbot, preview (or edit), rename, download, delete.
View and edit in the browser
No download, no office software. (PC only)
| Format | Action |
|---|---|
| [Preview] — read in place | |
| Word (.docx) | [Preview] — read with formatting preserved |
| Excel (.xlsx) · CSV | [Preview] — read as sheets and tables |
| HWP (Hangul) | [Edit] — opens the editor to change and save the content |
- Previews (PDF, Word, Excel) are read-only. To change those files, download, edit, and re-upload.
- [Edit] on an HWP file opens it in the document editor, where changes can be saved directly.
Document editor
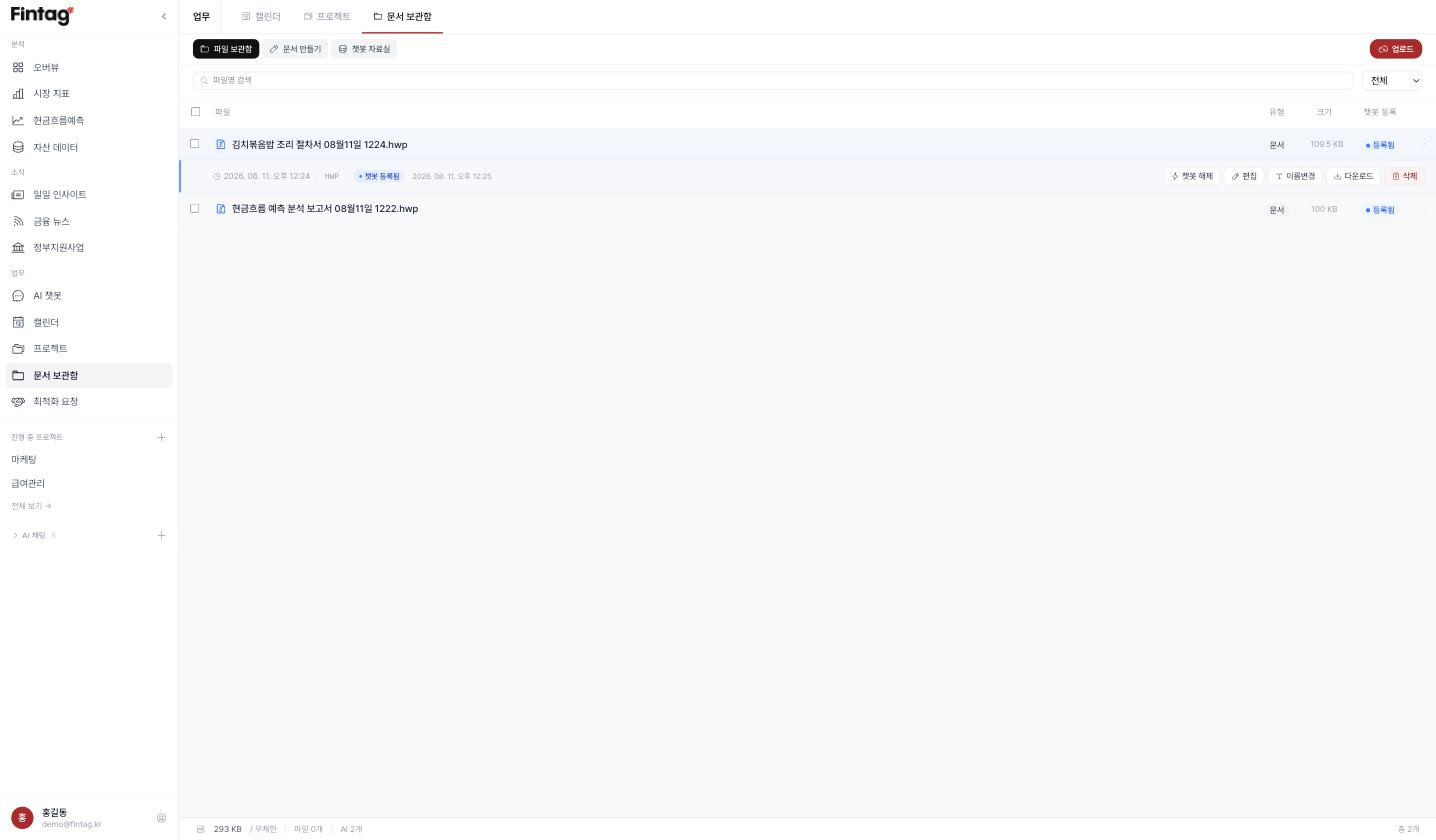
A web editor for writing and editing documents right in the browser, no office suite required. (PC only)
- Open previously uploaded HWP files and edit and save them in the browser.
- Use the toolbar for tables, fonts, and free-form formatting.
- The
AIbutton at the top right, or right-click →Write with Fintag AI, drafts documents or polishes text for you. - Saving updates the file in storage, and if the document is registered with the chatbot it is retrained automatically on save.
Save ascreates a new file. - Documents created in AI chat can be opened here with [Open in editor] to continue editing.
Chatbot Library
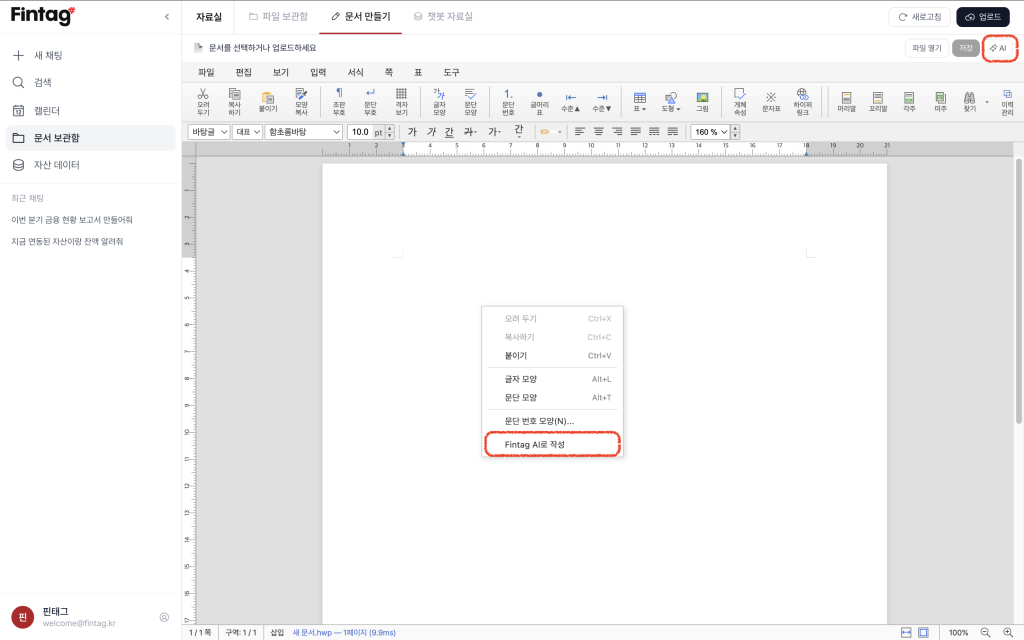
Uploading a file alone does not teach the AI its contents. One more step — AI training — is required.
- Go to the [Chatbot Library] tab at the top
- Press
Start chatbot training - When the progress bar reaches 100%, you can ask the chat about the contracts and Excel files you just uploaded.
- Documents that fail to train show the reason (e.g., "Could not extract text from the document").
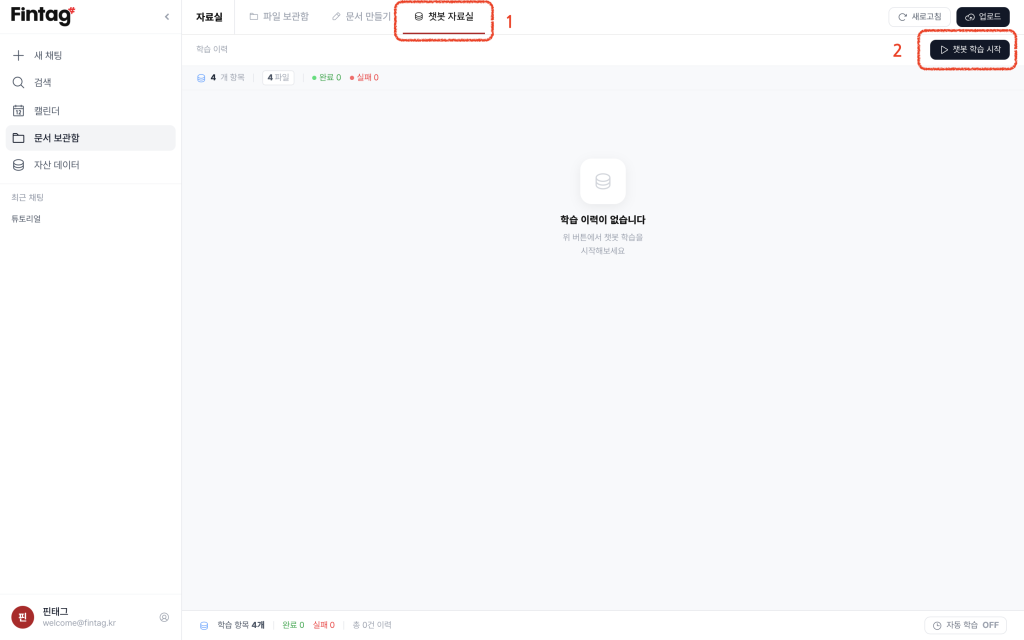
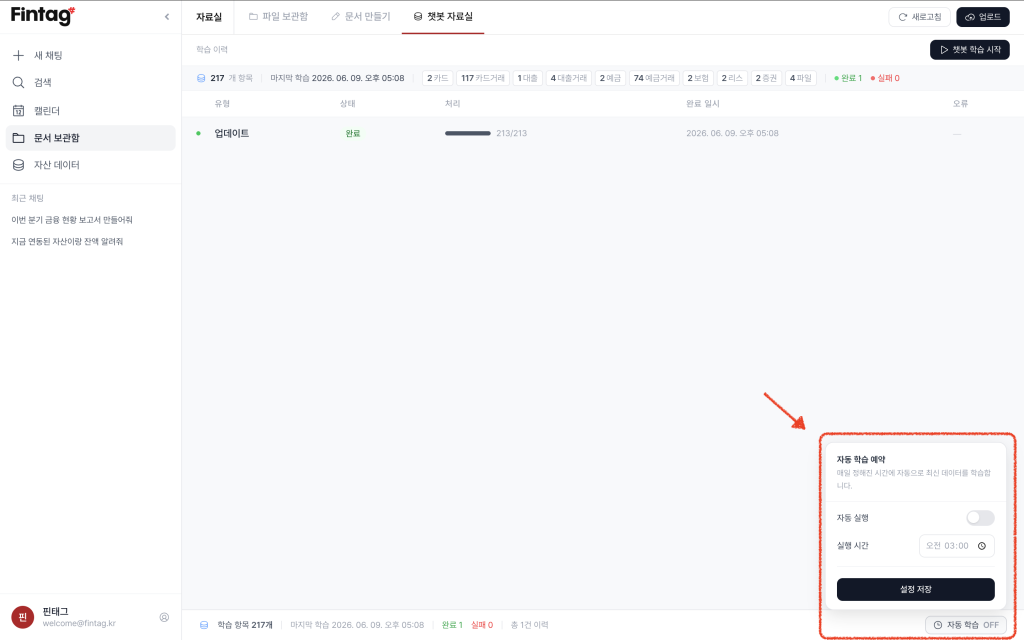
Turn on
Scheduled auto-trainingand the latest documents are trained automatically every night.
Asset Data (banks · cards · securities · leases · insurance)
Gather scattered financial assets in one view and replace your Excel ledger. Enter via [Asset Data] in the left sidebar.
Browsing your assets
Use the tabs at the top to review linked financial assets at a glance.
- Tabs at the top: Banks · Cards · Securities · Leases · Insurance
- Choose between List / Table view modes.
- Click an item to open its detail panel on the right (below, on mobile) with account information and transactions.
- Overseas card charges show both the local currency and KRW.
- Each bank account shows its lookup period notice, e.g., "Woori Bank provides the last 3 months of transactions." (Periods vary by bank; unlimited ones read "No limit on the lookup period.")
Downloading transactions to Excel
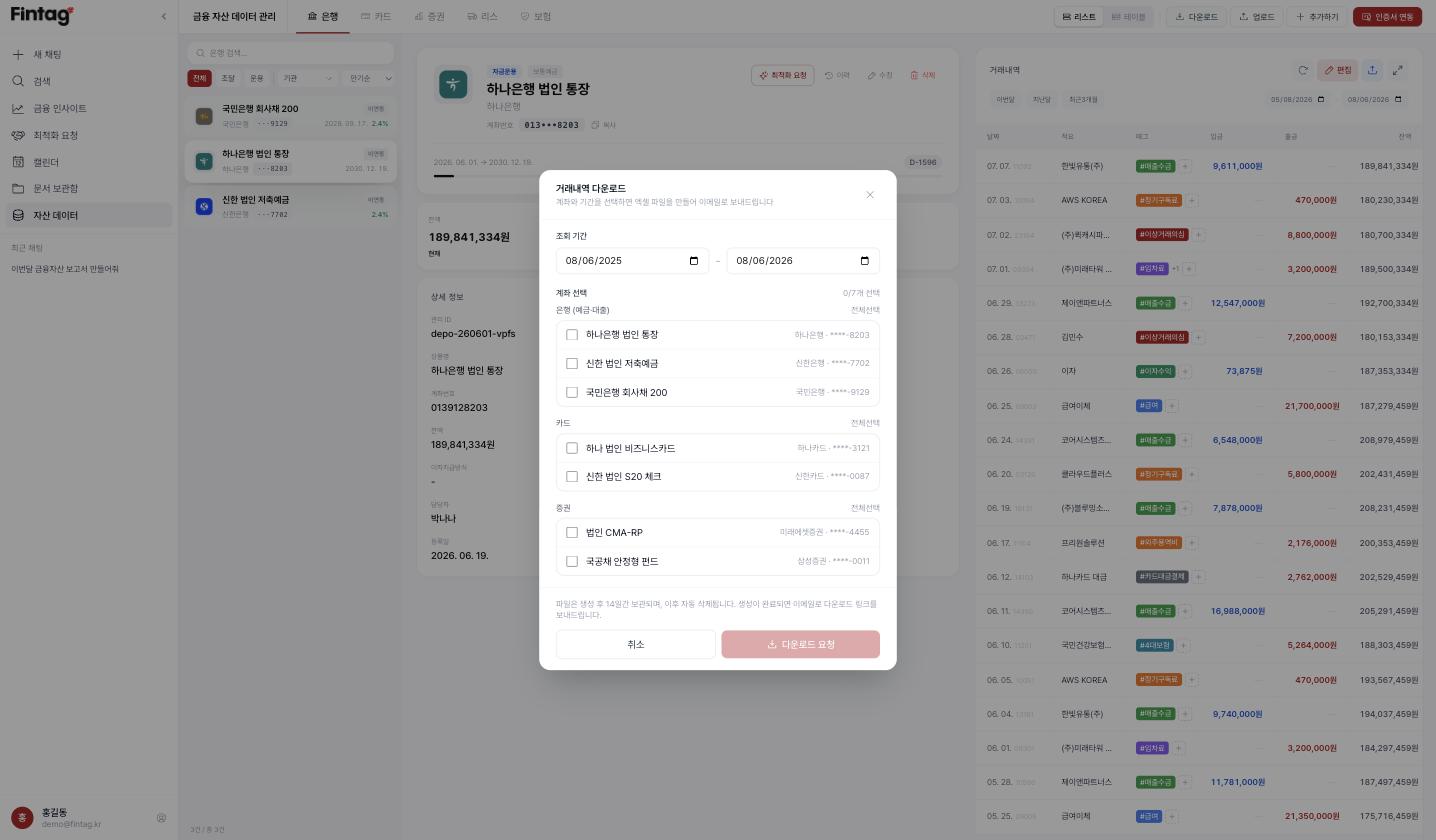
Press [Download] at the top right to export transactions from multiple accounts and cards to Excel at once.
- Select the accounts/cards and set the period.
- When the file is ready, a download link is sent by email.
- The link stays valid for 14 days, after which the file is deleted automatically.
Adding assets manually
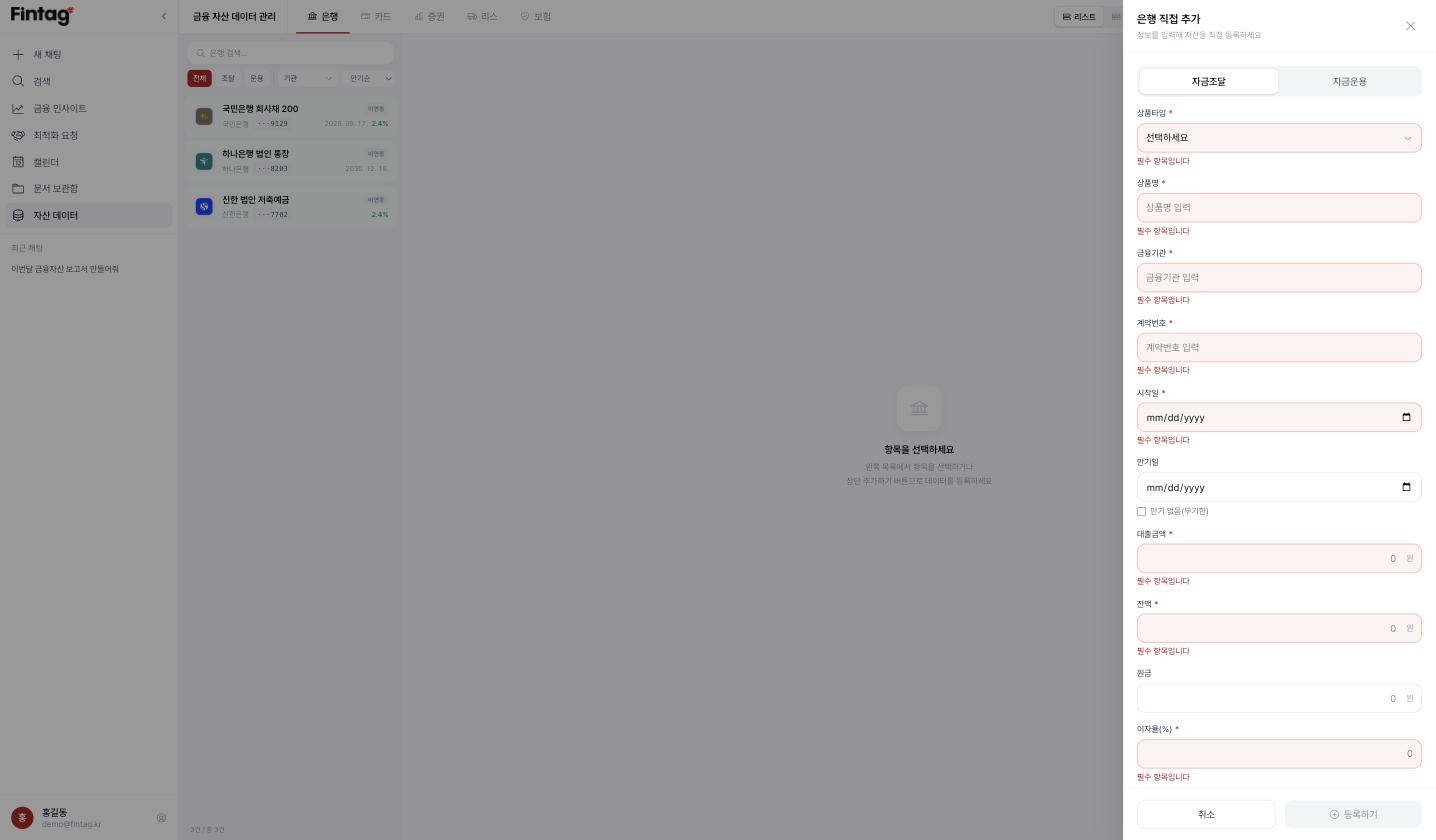
Assets that are hard to link with a certificate (personal loans, products from other institutions) can be registered directly with the [Add] button. Manually added assets also support manual transaction entry and editing.
Editing asset details
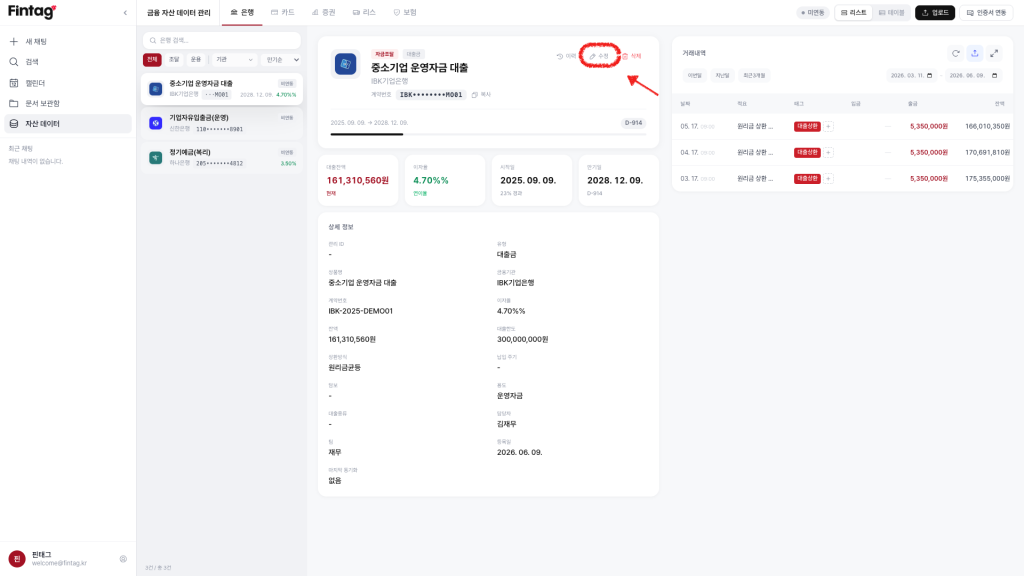
Press [Edit] in the detail panel to fill in missing details — alias, owner/team, memo, interest rate, maturity date, and more.
※ For linked (certificate-imported) assets, the institution's original data takes priority, so only fields like alias, owner, and memo can be edited.
- For loans and leases, the [Request Optimization] button in the detail panel opens a pre-filled optimization request for that product.
Transaction detail view
Press [Expand] on the transactions in the detail panel to open a dedicated screen where you can see all transactions and search/filter by date, description, place, tag, and amount — and attach a tag to each transaction.
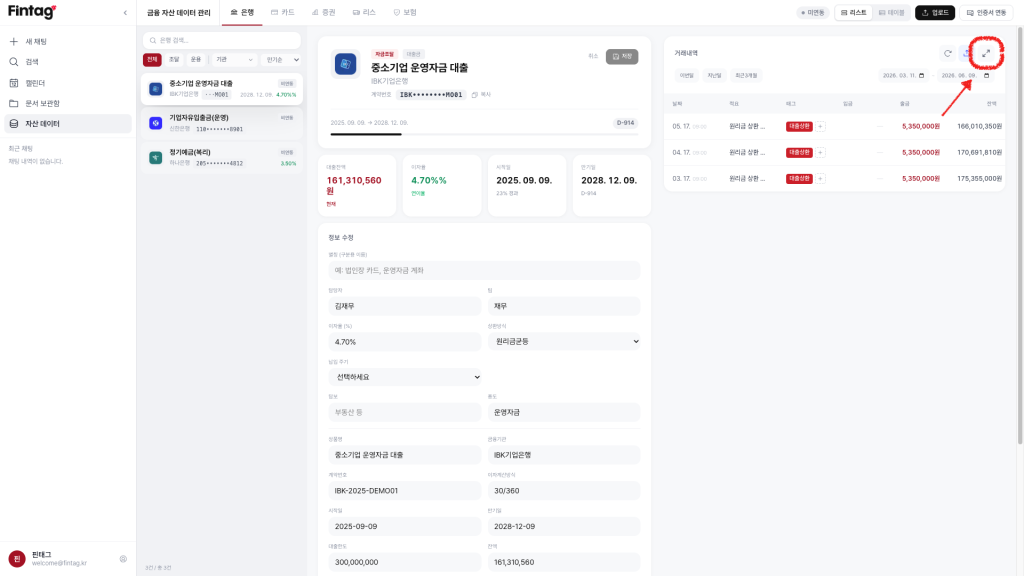
- Transactions classified here can also be grouped into project costs. (See Projects above.)
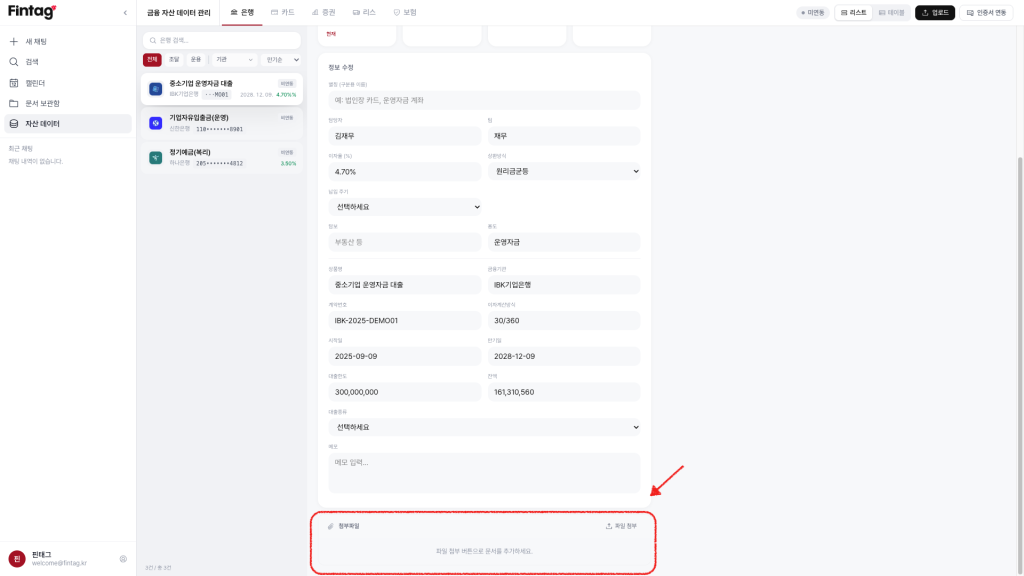
File attachments
Attach contracts and supporting files per asset. Deleting an attachment asks for confirmation.
Additional services
Account management, notifications, billing, and support features accessible from the user area at the bottom left.
Account Settings
Manage company information and your account, and control team permissions. Enter via [Account Settings] in the user menu; your password is re-confirmed on entry for safety.
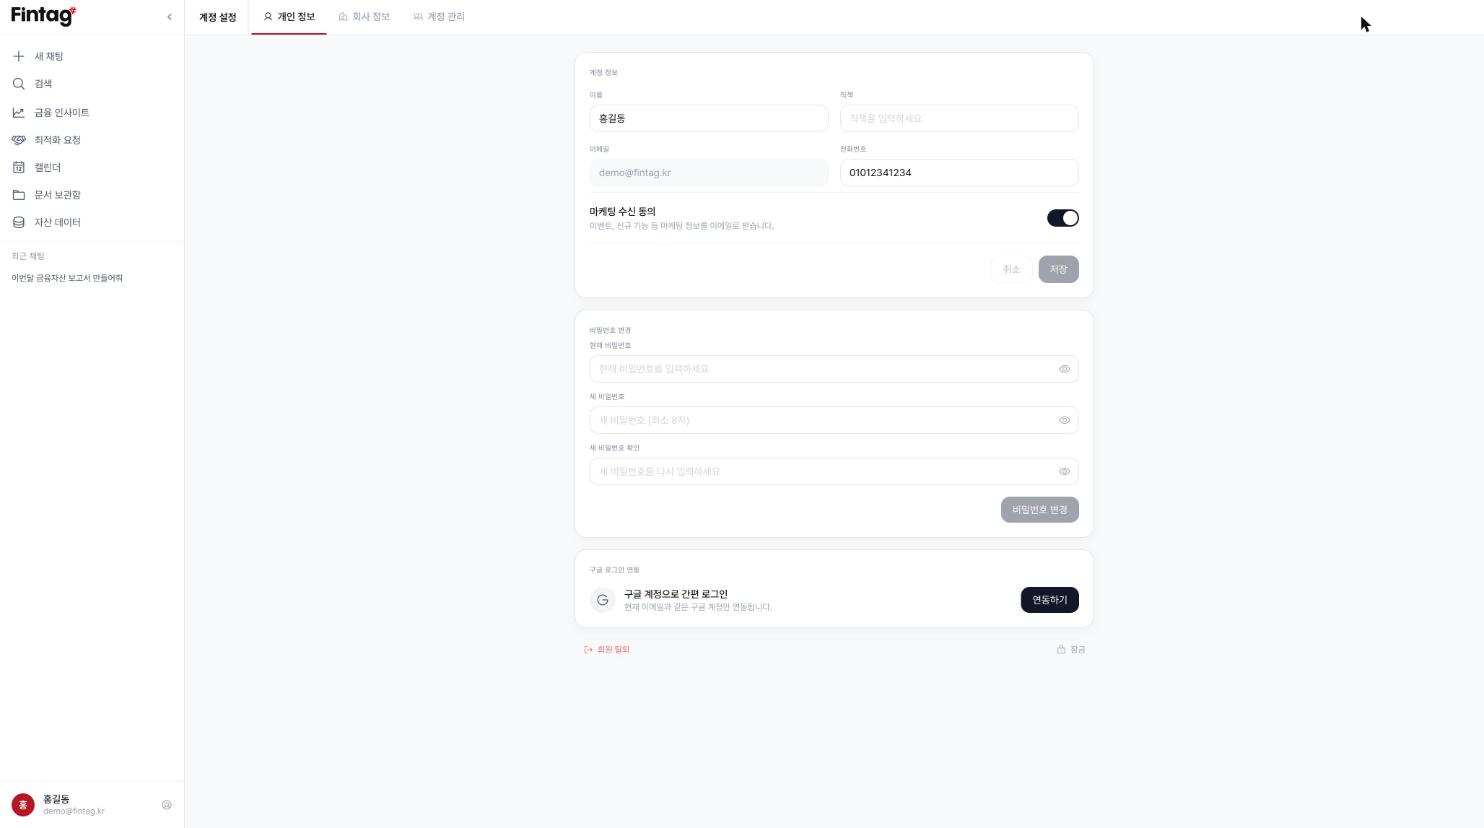
Personal information
Manage your account basics, security, and notification preferences.
- Account info: enter and edit your name, title, email, and phone number.
- Google sign-in link: link the Google account with the same email and sign in with one click, no password needed.
- Marketing consent: toggle emails about events and new features.
- Change password: verify your current password and set a new one. (Accounts created with Google only can set a password here.)
- [Delete account] at the bottom ends your use of the service.
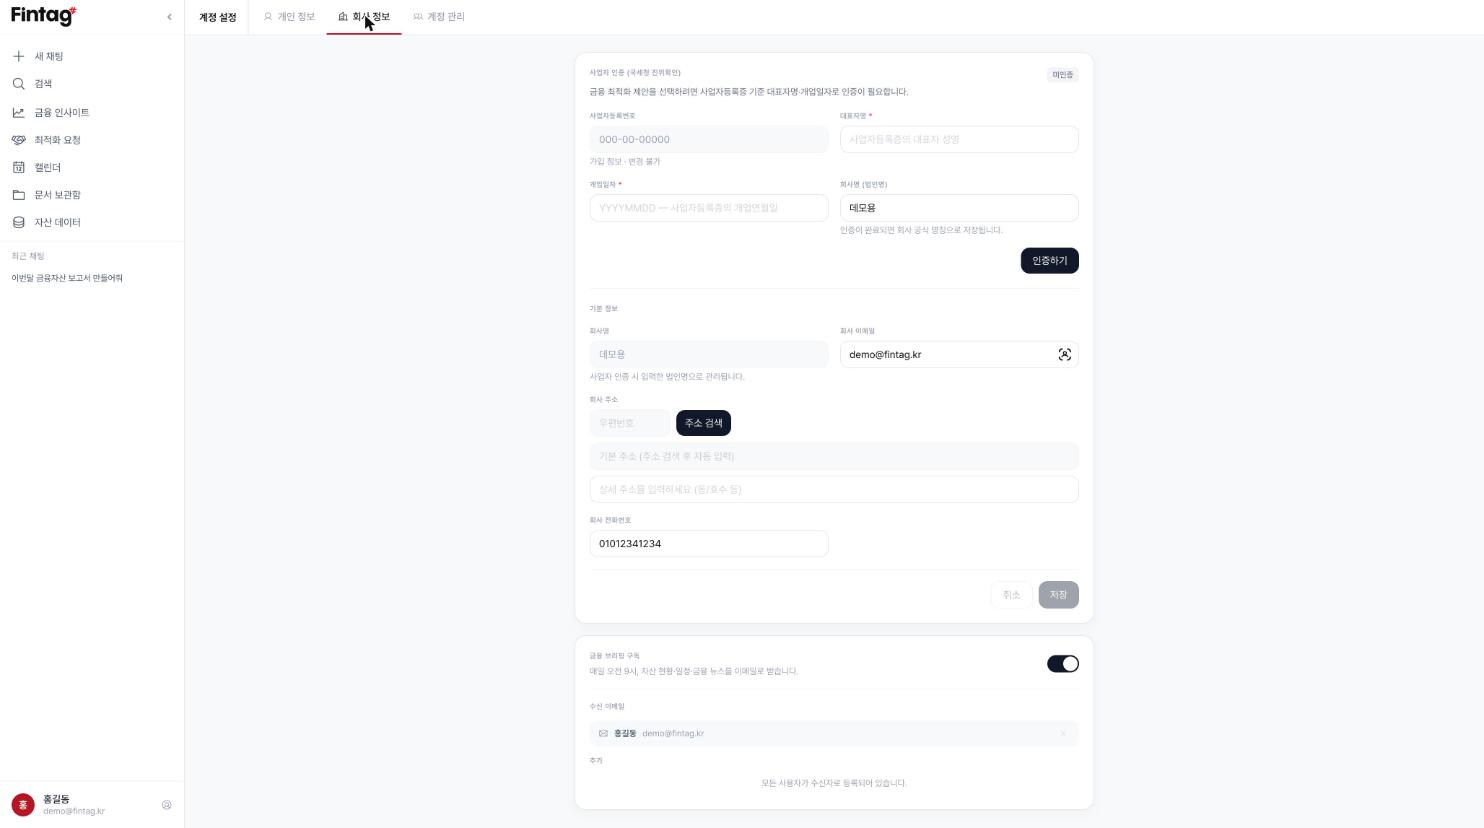
Company information
Manage company basics, business verification, and automated notifications in one tab.
- Review and edit company information such as address and business registration number. (The business registration number cannot be changed.)
- Business verification: enter the representative's name and business start date for a National Tax Service authenticity check. It is required to select an optimization proposal, so we recommend doing it in advance.
- The Financial Briefing subscription — a daily summary email every morning — is configured here.
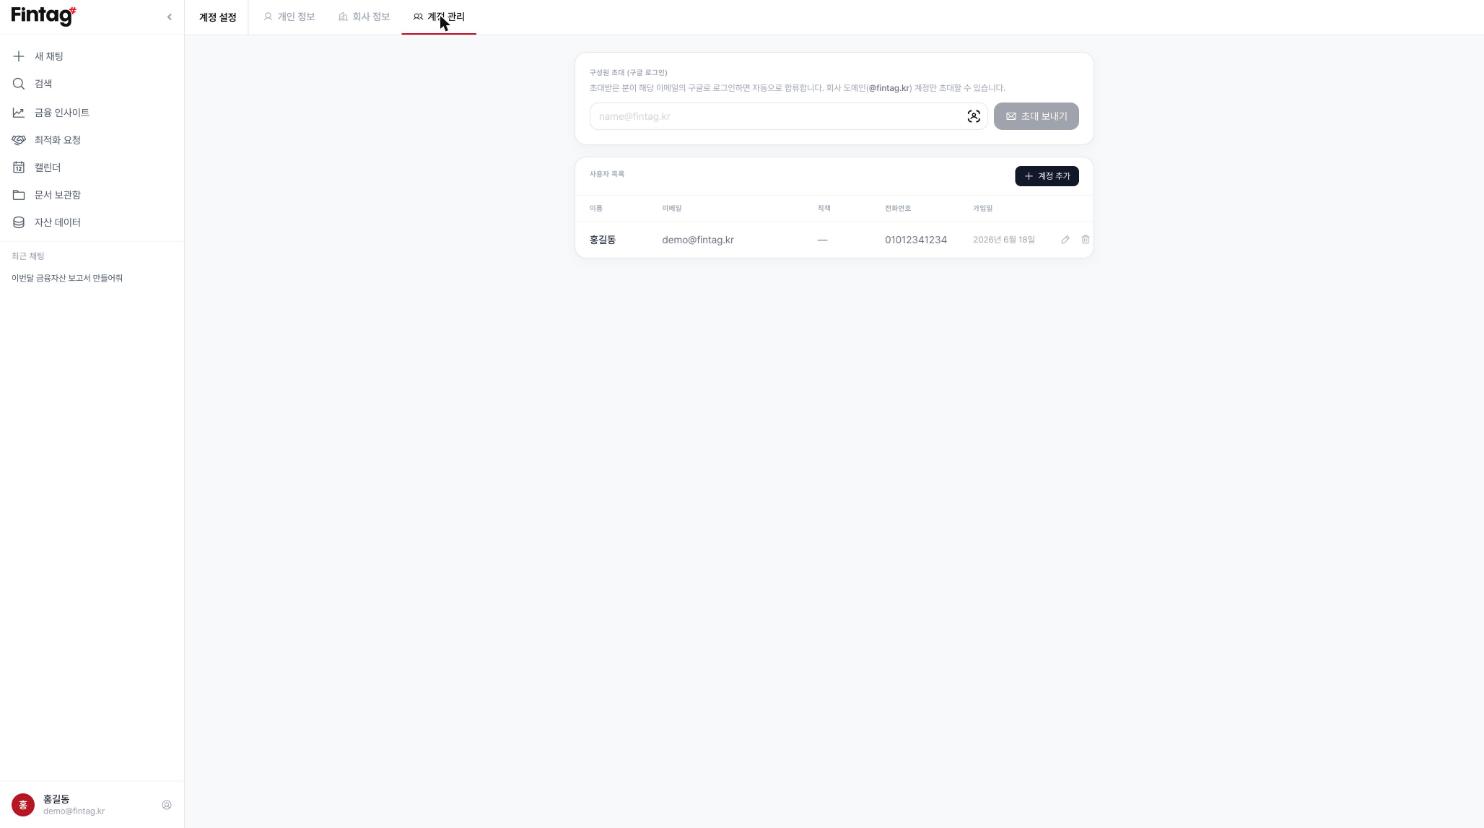
Member management (admin only)
Visible only to accounts with admin permission — invite teammates and manage access.
- Invite members (Google sign-in): only accounts on the same company email domain can be invited. The invitee joins automatically by signing in with that email's Google account.
- Add accounts directly: create teammate accounts yourself with the [+ Add Account] button.
- Edit & permissions: the pencil icon (✏️) in the user list edits member details and assigns per-feature access (dashboard, assets, projects, documents, and so on).
- Blocking leavers: press the delete (trash) button for a departed employee and access is blocked immediately.
Financial Briefing
Every morning at 9, receive a summary email of your company's key cash movements and financial status — without logging in to Fintag.
When the Financial Briefing subscription in Account Settings is on, a daily briefing arrives at your company email every morning at 9.
- What's inside: assets maturing today, yesterday's major deposits/withdrawals/payments, an asset & liability summary, a cashflow forecast · anomaly summary, and market indicators · key financial news
- AI one-liner: a note like "Cash outflow is higher than yesterday — attention needed" (this summary does not consume company tokens)
- Past briefings can be re-read on the web in Financial Insights → Daily Insights.
- To stop receiving it, use the unsubscribe link at the bottom of the email.
Subscribing to the briefing
Open the user area, go to
Account Settings, then theCompany informationtab, and turn on the Financial Briefing subscription.
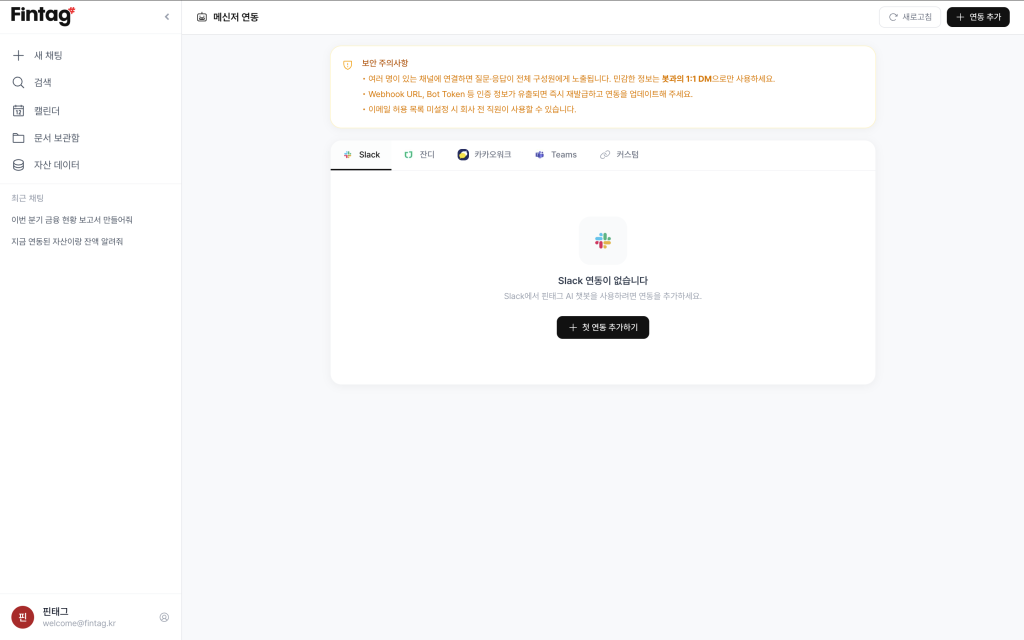
Messenger integration
Receive key Fintag notifications directly in the work messenger your company already uses, such as Slack or KakaoWork.
- Path: user menu → [Messenger Integration]
- Supported channels: Slack, Jandi, KakaoWork, Microsoft Teams, custom webhooks
- Setup: copy the Webhook URL issued in your messenger's admin page and paste it into the input field — that's it.
- Verify: after setup, always press [Send test message] to confirm notifications arrive in the selected channel.
Transaction tags
Manage the labels that classify transactions (#rent, #payroll, #sales-collection, and so on). The better organized your tags, the more precisely the AI can answer questions like "How much did we spend on meals this month?" — and the more accurate project spend-by-category totals become.
Tag flow types (colors)
Tags are color-coded by the direction of money flow.
- 🔴 EXPENSE: money going out (red family)
- 🟢 INCOME: money coming in (green family)
- ⚪ NEUTRAL: neutral transactions such as simple transfers (gray family)
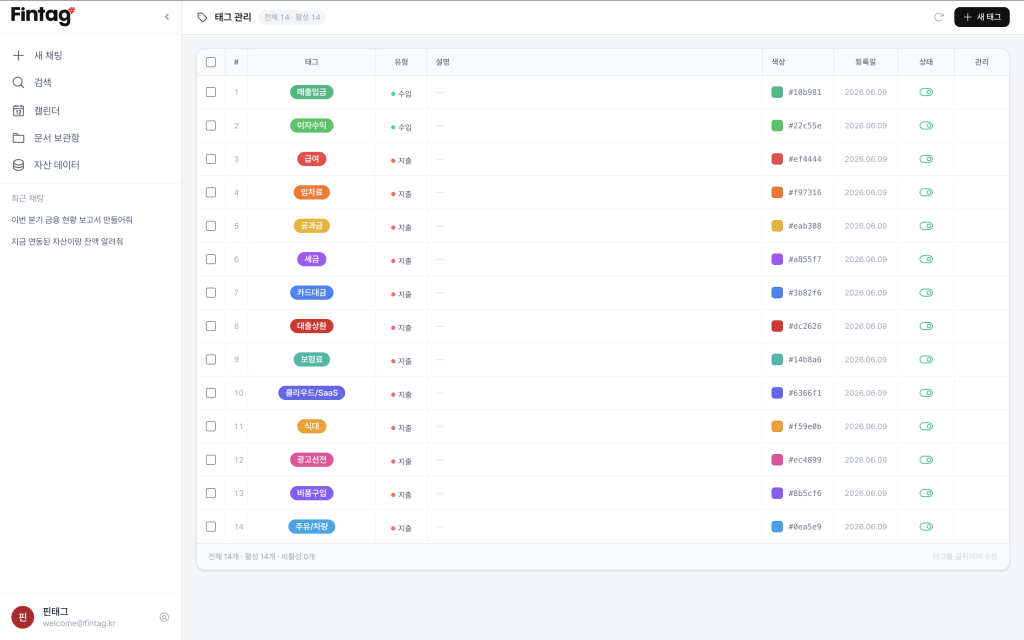
Tag management screen
Enter via the user menu at the bottom left → [Transaction Tags] to create and manage tags tailored to your company.
- New tag: press [New Tag] at the top right, set the name, flow type, and color, then save.
- Edit: press the pencil icon (✏️) on a tag row. (Pressing save with no changes simply closes the dialog.)
- Active/inactive toggle: toggling status asks for confirmation first. Inactive tags are excluded from AI auto-classification and from tag pickers in transaction views.
- Bulk actions: select multiple tags with the checkboxes and an action bar appears at the top for bulk activate / deactivate / delete.
- Delete: deleting asks for confirmation; proceeding also removes that tag from all transactions it was attached to.
AI auto-tagging
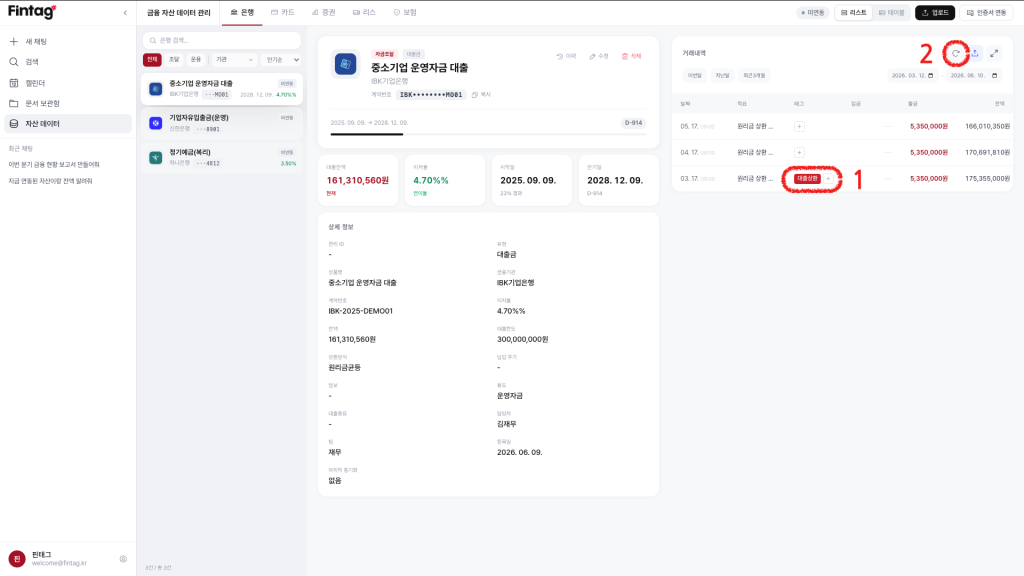
No need to classify thousands of transactions by hand — assign once and the AI learns the pattern.
- In the transaction table, press the tag add (
+) button and assign the right tag once. (e.g., tag a principal-and-interest payment as#loan-repayment) - Press the [Refresh] icon at the top right of the list — the AI learns your classification style and tags similar future transactions automatically.
Subscription · Tokens · Coupons
Review and change your Fintag plan, and manage token balance and payment methods in one place.
- Path: bottom-left profile menu → [Subscription · Tokens · Coupons]
- ※ Due to app store policies, subscription and payment screens are not available in the mobile app. Please use the PC web.
::: info About AI tokens
⏺ New sign-ups receive free tokens, enough to fully try Fintag AI's analysis features.
⏺ Long AI answers (output) cost more to process than your questions (input), so they consume relatively more tokens.
:::
Subscription & tokens
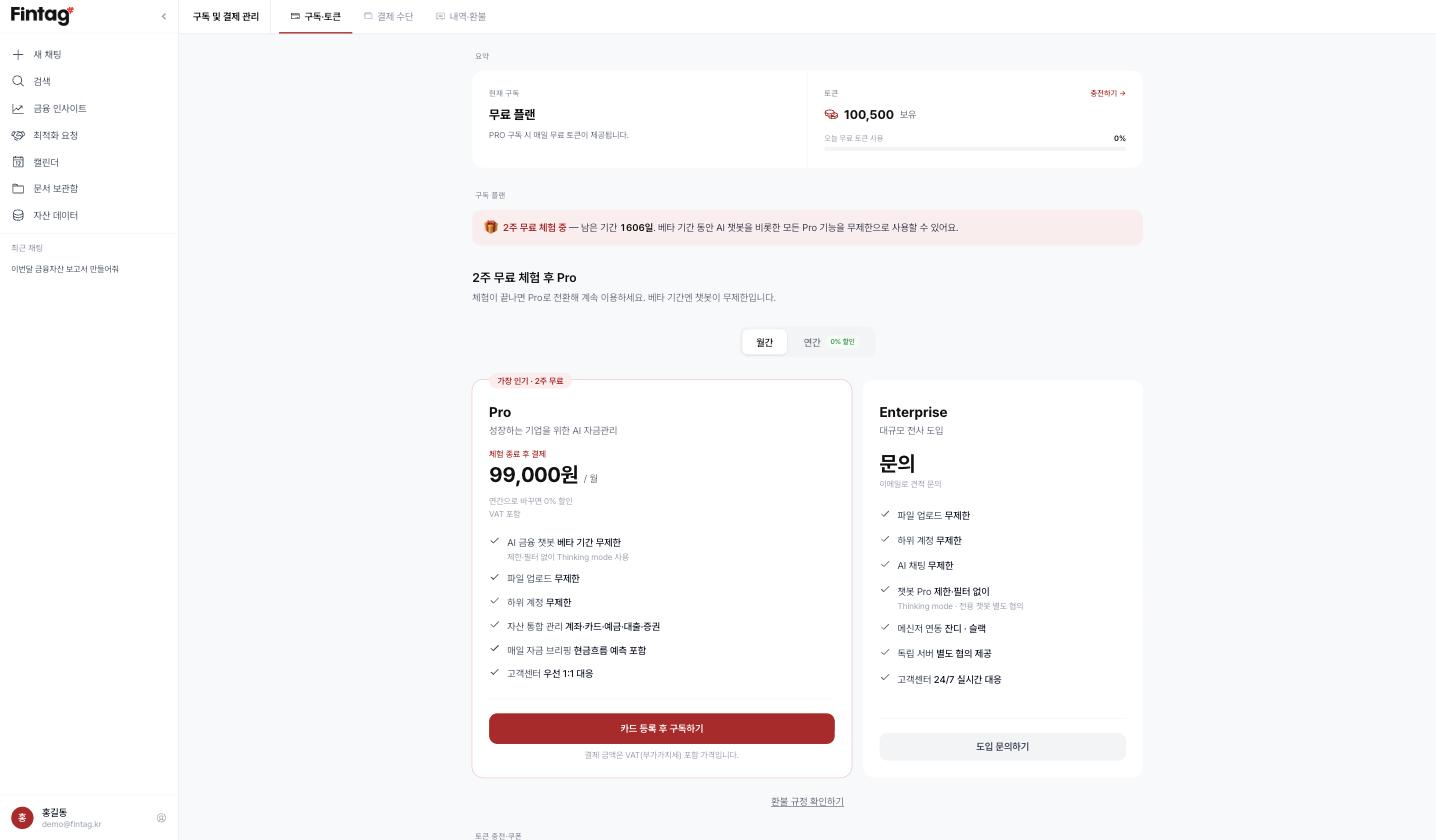
The main tab for checking your current plan and token status, and upgrading to a plan that fits your business.
- Summary: see your current plan and token balance at the top.
- Plans: after the 2-week free trial, subscribe to the Pro plan monthly or yearly (discounted). For large-scale rollouts, request a consultation via the Enterprise plan's [Contact Sales].
- Tokens & coupons: buy additional tokens or register a coupon code for subscription benefits. For coupon subscriptions, apply for an extension before expiry and an automatic payment is scheduled for the end date.
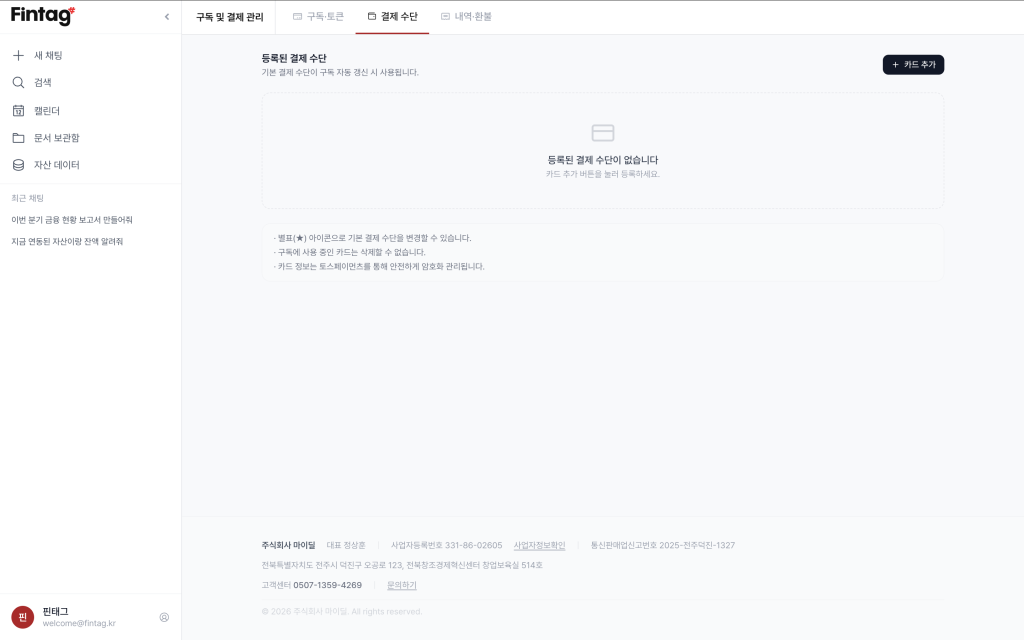
Payment methods
Register and manage the payment methods used for subscription renewals and AI token purchases.
- Add a card: press [+ Add Card] at the top right to register a corporate card.
- Default payment method: click the star (★) icon in the card list to change the default.
- Safety notes:
• Card details are encrypted and managed via Toss Payments.
• The card currently used by an active subscription cannot be deleted.
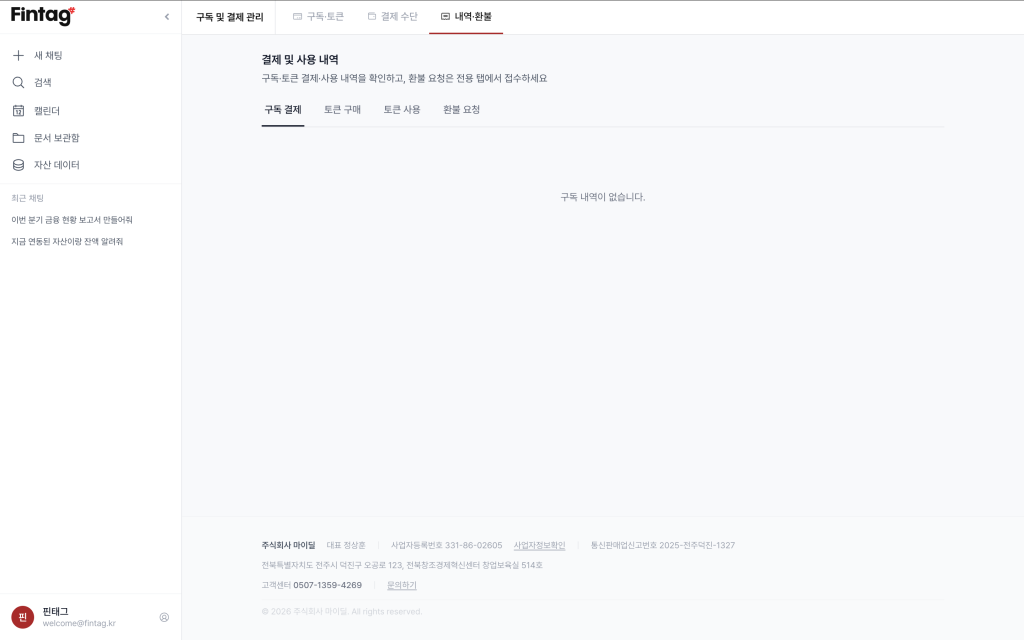
History & refunds
Review subscription and token payment/usage history, and request refunds when needed.
- Detailed history: move between the sub-tabs to inspect subscription payments, token purchases, and token usage separately.
- Refund requests: for cancellations and refunds, go to the [Refund Request] tab to file one and track its status.
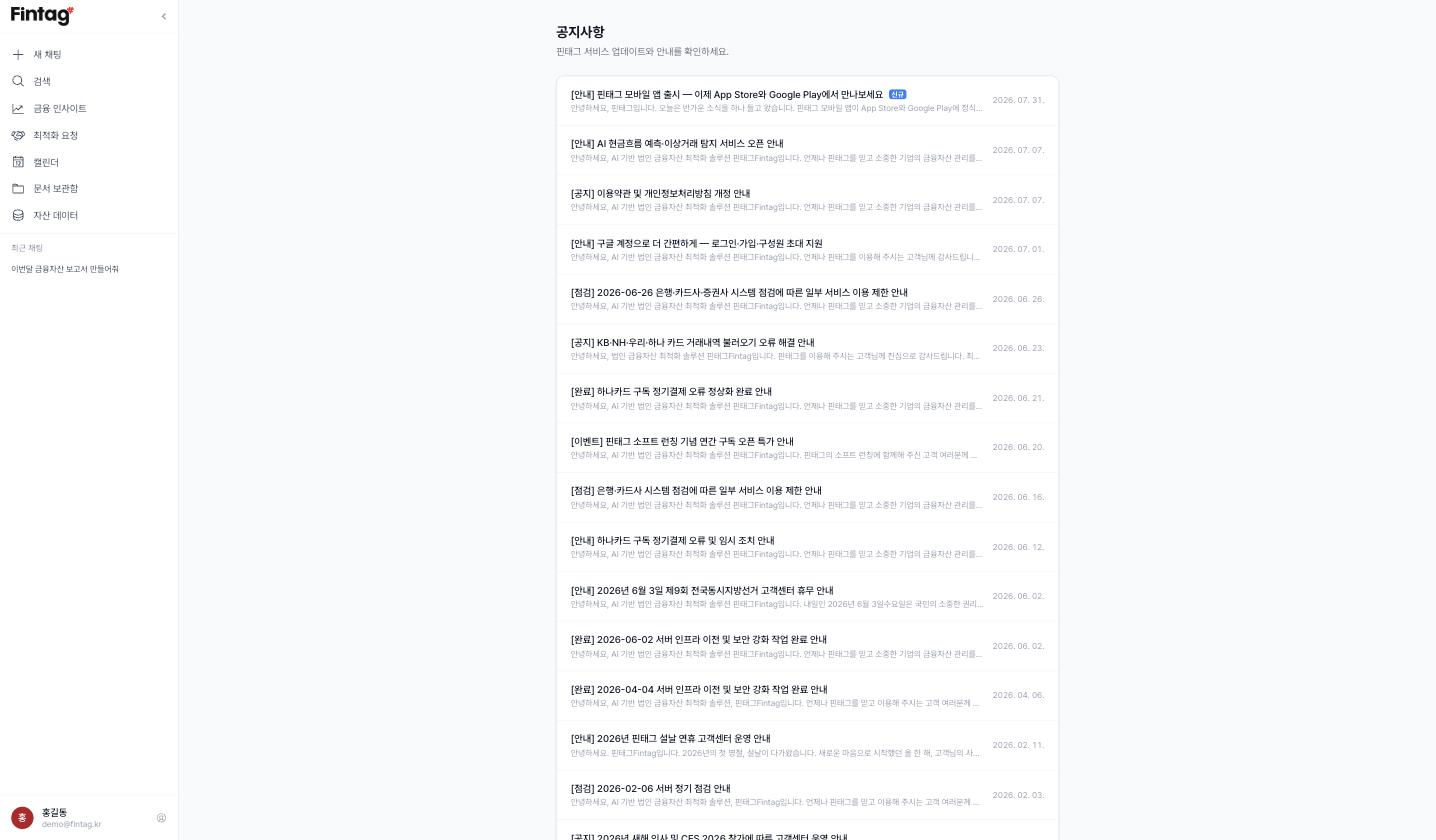
Announcements
Check Fintag news such as new feature releases and maintenance schedules.
- Path: user menu → [Announcements] (important notices also appear as a banner at the top of Home.)
- Click a title in the list to read the details.
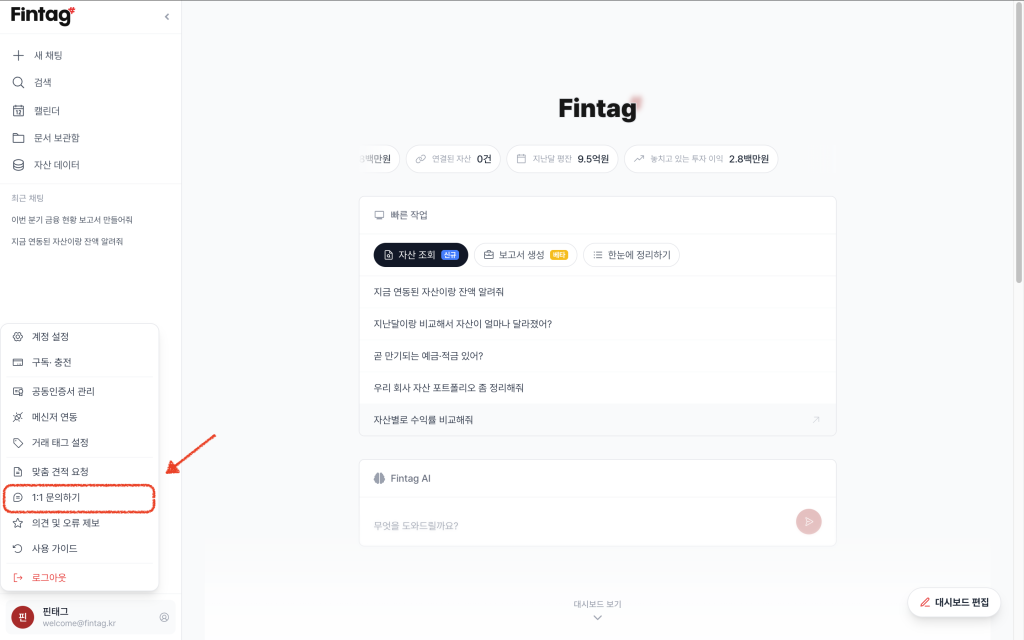
1:1 Inquiry
The official support channel for anything you get stuck on while using Fintag.
- Path: user menu → [1:1 Inquiry]
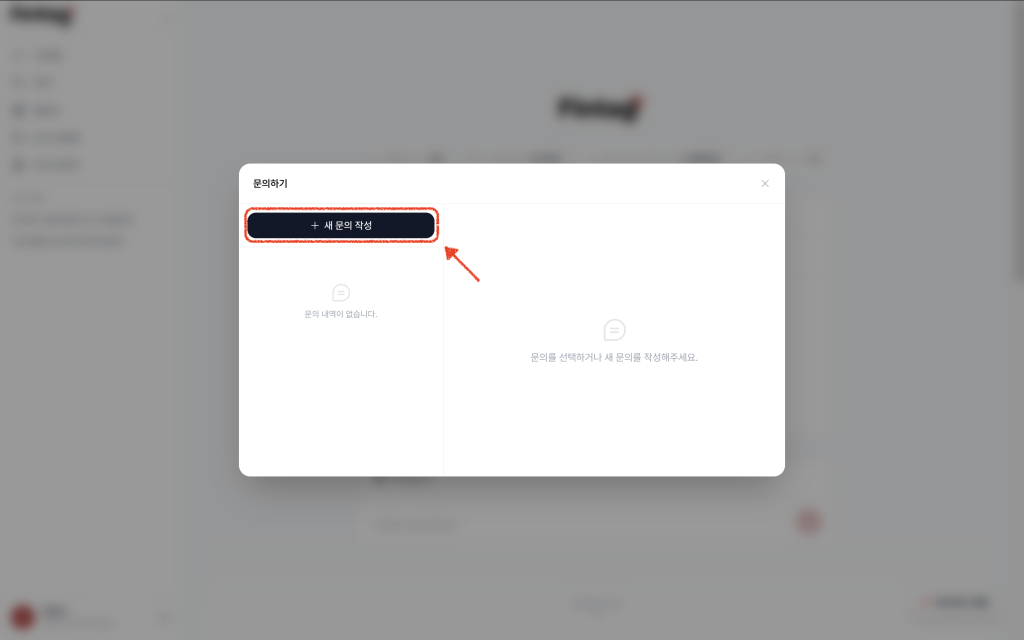
- New inquiry: enter a title, category, priority (Normal/High/Urgent), and a clear description.
- Managing and conversing: open inquiries from list → detail, read admin replies like messenger comments, and ask follow-up questions.
- Mobile support: on mobile, list and detail become a single intuitive screen; the back (←) button at the top returns to the list.
- Closing: when resolved, press [Close Inquiry] to mark it complete.
Feedback & bug reports
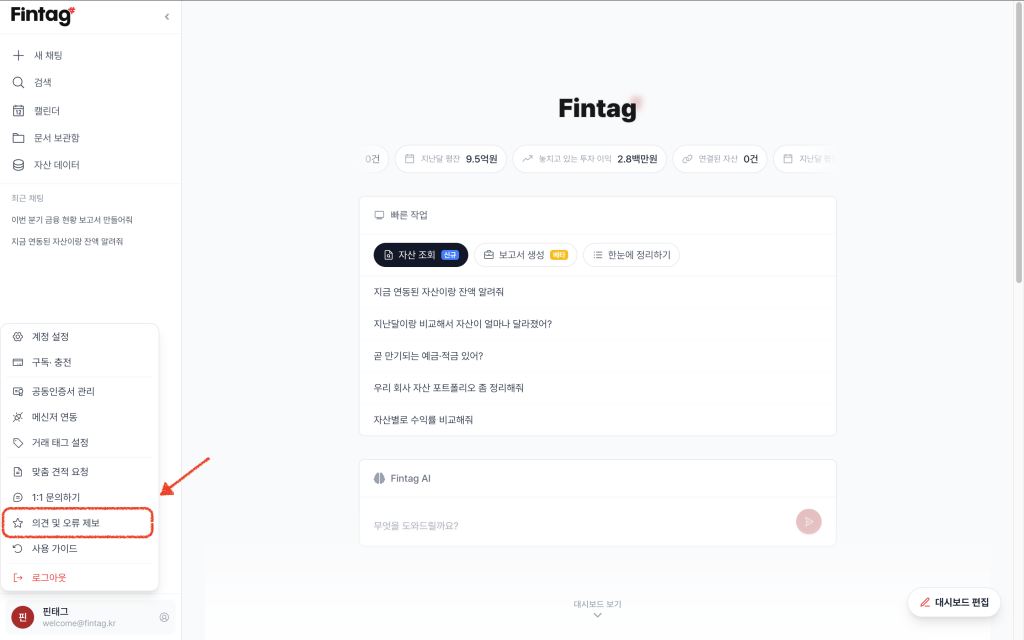
A space for collecting your ideas to make Fintag better and fixing inconveniences quickly.
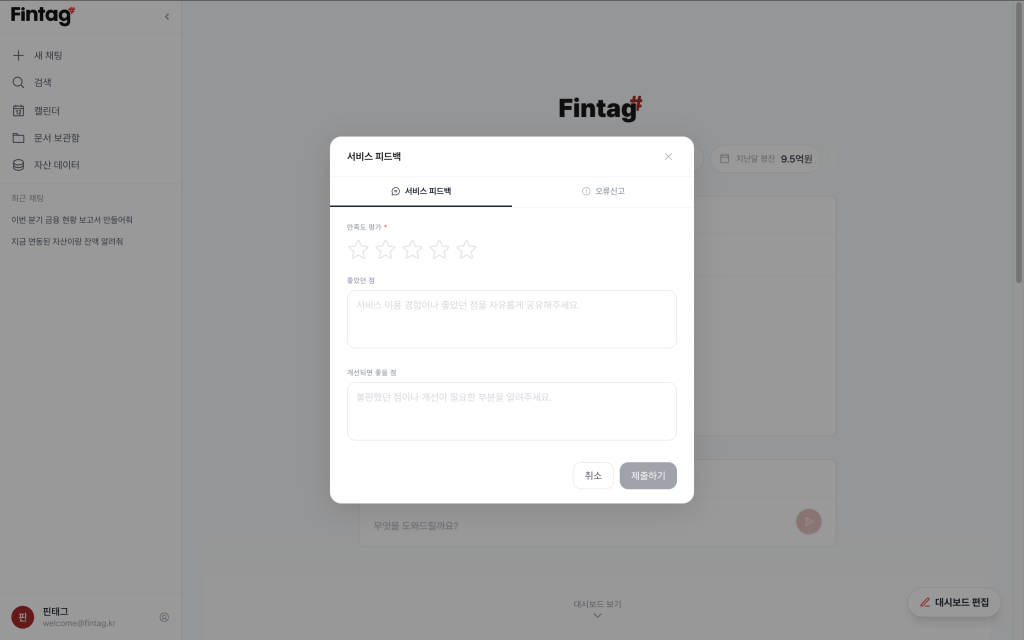
- Feedback: leave a star rating and freely suggest new features or improvements.
- Bug reports: report frozen screens, unresponsive buttons, or any errors you encounter and we will investigate quickly.
Appendix
Security policy, FAQs, and quick paths to features.
Is my data safe? (Security)
Fintag handles a company's most sensitive funds and documents, so we guarantee the following:
- Passwords are never stored — certificate and card-site passwords entered during linking are used only in that moment and immediately discarded. They are never kept on our servers.
- Strong encryption — registered certificates and financial data are stored with bank-grade encryption.
- Complete company isolation — it is technically impossible for another company to access your data.
- Domestic storage — all data is stored in Korea (Seoul).
- Permission management — admins control which menus and features each teammate can access. Projects can be set to private so only the owner, members, and company administrators can see them.
FAQ
Q. I made a card payment today but it doesn't show on the assets screen. A. Automatic collection runs daily or at set times. For an immediate update, press ↻ Refresh on the assets screen, or Refresh the institution's data in Certificate Management.
Q. I can't register a certificate on mobile (app). A. Certificate files must be loaded directly, so registration is PC only. Once linked on PC, you can browse data and use AI chat freely on mobile and in the app.
Q. I can't sign up with a personal email (gmail, etc.). A. Fintag is a business service — only company-domain emails can sign up. Please try again with your company email.
Q. The AI says it doesn't know about the Excel file I just uploaded. A. The file hasn't been through AI training yet. Go to Documents → [Chatbot Library] and press Start chatbot training, or use the [Update Chatbot] button at the top right of the chat screen.
Q. I asked for a report but only got a chat reply. A. Phrase it as a request — "create", "write", "draft". For charts, add something like "show monthly spending as a bar chart".
Q. Transactions aren't being added to my project automatically. A. That is by design. Only transactions you check are included. Use Add transactions in the project detail screen.
Q. After re-linking a certificate, project transactions show "source deleted". A. Re-linking recreates the source transactions. The amounts are preserved, and rows are re-linked automatically when the same transaction is collected again.
Q. Can I edit a PDF or Excel file in the browser? A. PDF, Word, and Excel are view-only. The format you can edit and save directly in the browser is HWP. For others, download, edit, and re-upload.
Q. I shared my calendar subscription address by mistake. A. Press Reissue on the calendar share screen; the old address stops working immediately.
Q. It says my free trial has ended. A. The free trial ends 2 weeks after signing up. Subscribe to the Pro plan in Subscription · Tokens · Coupons to continue.
Q. I don't see the subscription/payment menu in the app. A. App store policies prevent in-app payment. Please use the PC or mobile web (app.fintag.kr).
Q. Changing a maturity date to before the start date won't save. A. That is intentional — validation prevents saving incorrect dates and numbers. Check the date order and number format.
Q. An employee left the company. How do I block access? A. An admin deletes the employee in Account Settings → Member management, and access is blocked immediately.
Q. If I unlink a certificate, is the data deleted too? A. Yes. Deposits, loans, cards, securities, and transactions collected via that certificate are deleted together. If you only need fresh data, use Refresh instead.
Quick reference — where to do what
| What you want to do | Where |
|---|---|
| Auto-link banks/cards/securities | User menu → Certificate Management (PC) |
| See assets, balances, transactions | Asset Data |
| Download transactions to Excel | Asset Data → Download |
| Edit asset info / memos | Asset Data → select item → Edit |
| Tag transactions | Asset Data → expand transactions |
| Create / bulk-manage tags | User menu → Transaction Tags |
| See cash status & forecasts | Overview · Cash Flow Forecast |
| Indices, rates, commodities | Market Indicators |
| Today's financial news | Financial News |
| Re-read yesterday's summary | Daily Insight |
| Find government programs | Government Support Programs |
| Improve financial product terms | Optimization Request (progress: Financial Optimization) |
| Manage project budget & spending | Projects |
| Project settlement report | Projects → detail → Notes → Create Report |
| Export project spending to Excel | Projects → detail → Spending → Export |
| Upload documents / AI training | Documents → Chatbot Library |
| View a PDF or spreadsheet in place | Documents → Preview |
| Edit an HWP document | Documents → Edit (Document editor) |
| Ask the AI / generate a document | AI Chatbot (or the Fintag AI input on Home) |
| Maturity & payment schedules | Calendar |
| Connect messenger alerts | User menu → Messenger Integration |
| Invite teammates / permissions | User menu → Account Settings → Member management |
| Buy tokens / register coupons | User menu → Subscription · Tokens · Coupons |
| Get help | User menu → 1:1 Inquiry |
This document is the official user manual for Fintag users (managers and CFOs) and is updated as features improve.
Fintag currently serves companies in South Korea, with international expansion planned. For business inquiries: Contact Business →